Camera or microphone not working during your Ropes assessment?
Last updated: July 27, 2026
If Ropes cannot find your camera or microphone, the preview is blank or frozen, or the equipment test does not detect your voice, find the message or symptom below and follow that section.
If your assessment timer has already started: keep the original assessment tab open while you troubleshoot so you can return to it if needed.
Find your issue
Issue | Go to |
|---|---|
Camera or microphone access is blocked or denied | |
No camera or microphone is found | |
Camera or microphone is already in use | |
Video is black, blank, frozen, or unhealthy | |
Microphone test says “Make some noise to continue” | |
A permission setting is missing, disabled, or greyed out | |
You need to change Windows privacy settings | |
You need to change Mac privacy settings |
Try these quick fixes first
Remove any privacy cover, tape, or shutter blocking the camera lens.
If you use a headset, turn off its physical mute switch.
Close applications and tabs that may be using the camera or microphone, including Zoom, Microsoft Teams, Google Meet, FaceTime, another browser, and another meeting or assessment tab.
If you use a USB webcam, headset, docking station, or monitor with a built-in camera or microphone, unplug it, wait 10 seconds, and reconnect it.
Return to the Ropes Video Recording Setup step and select Enable Camera & Microphone.
When Chrome or Edge asks for permission, choose Allow while visiting the site, Allow this time, or Allow for both devices.
If the issue continues, try the assessment link in a Chrome Incognito window or an Edge InPrivate window. Follow the browser-specific steps below and allow camera and microphone access again.
When you can see yourself, select Confirm Video Works. Speak normally until the audio meter moves, then select Confirm Microphone Works.
Try an Incognito or InPrivate window
A private window starts with fresh site permissions and usually disables browser extensions. This can help if a saved browser setting or extension is preventing camera or microphone access.
Google Chrome
Copy your Ropes assessment link from the current browser window.
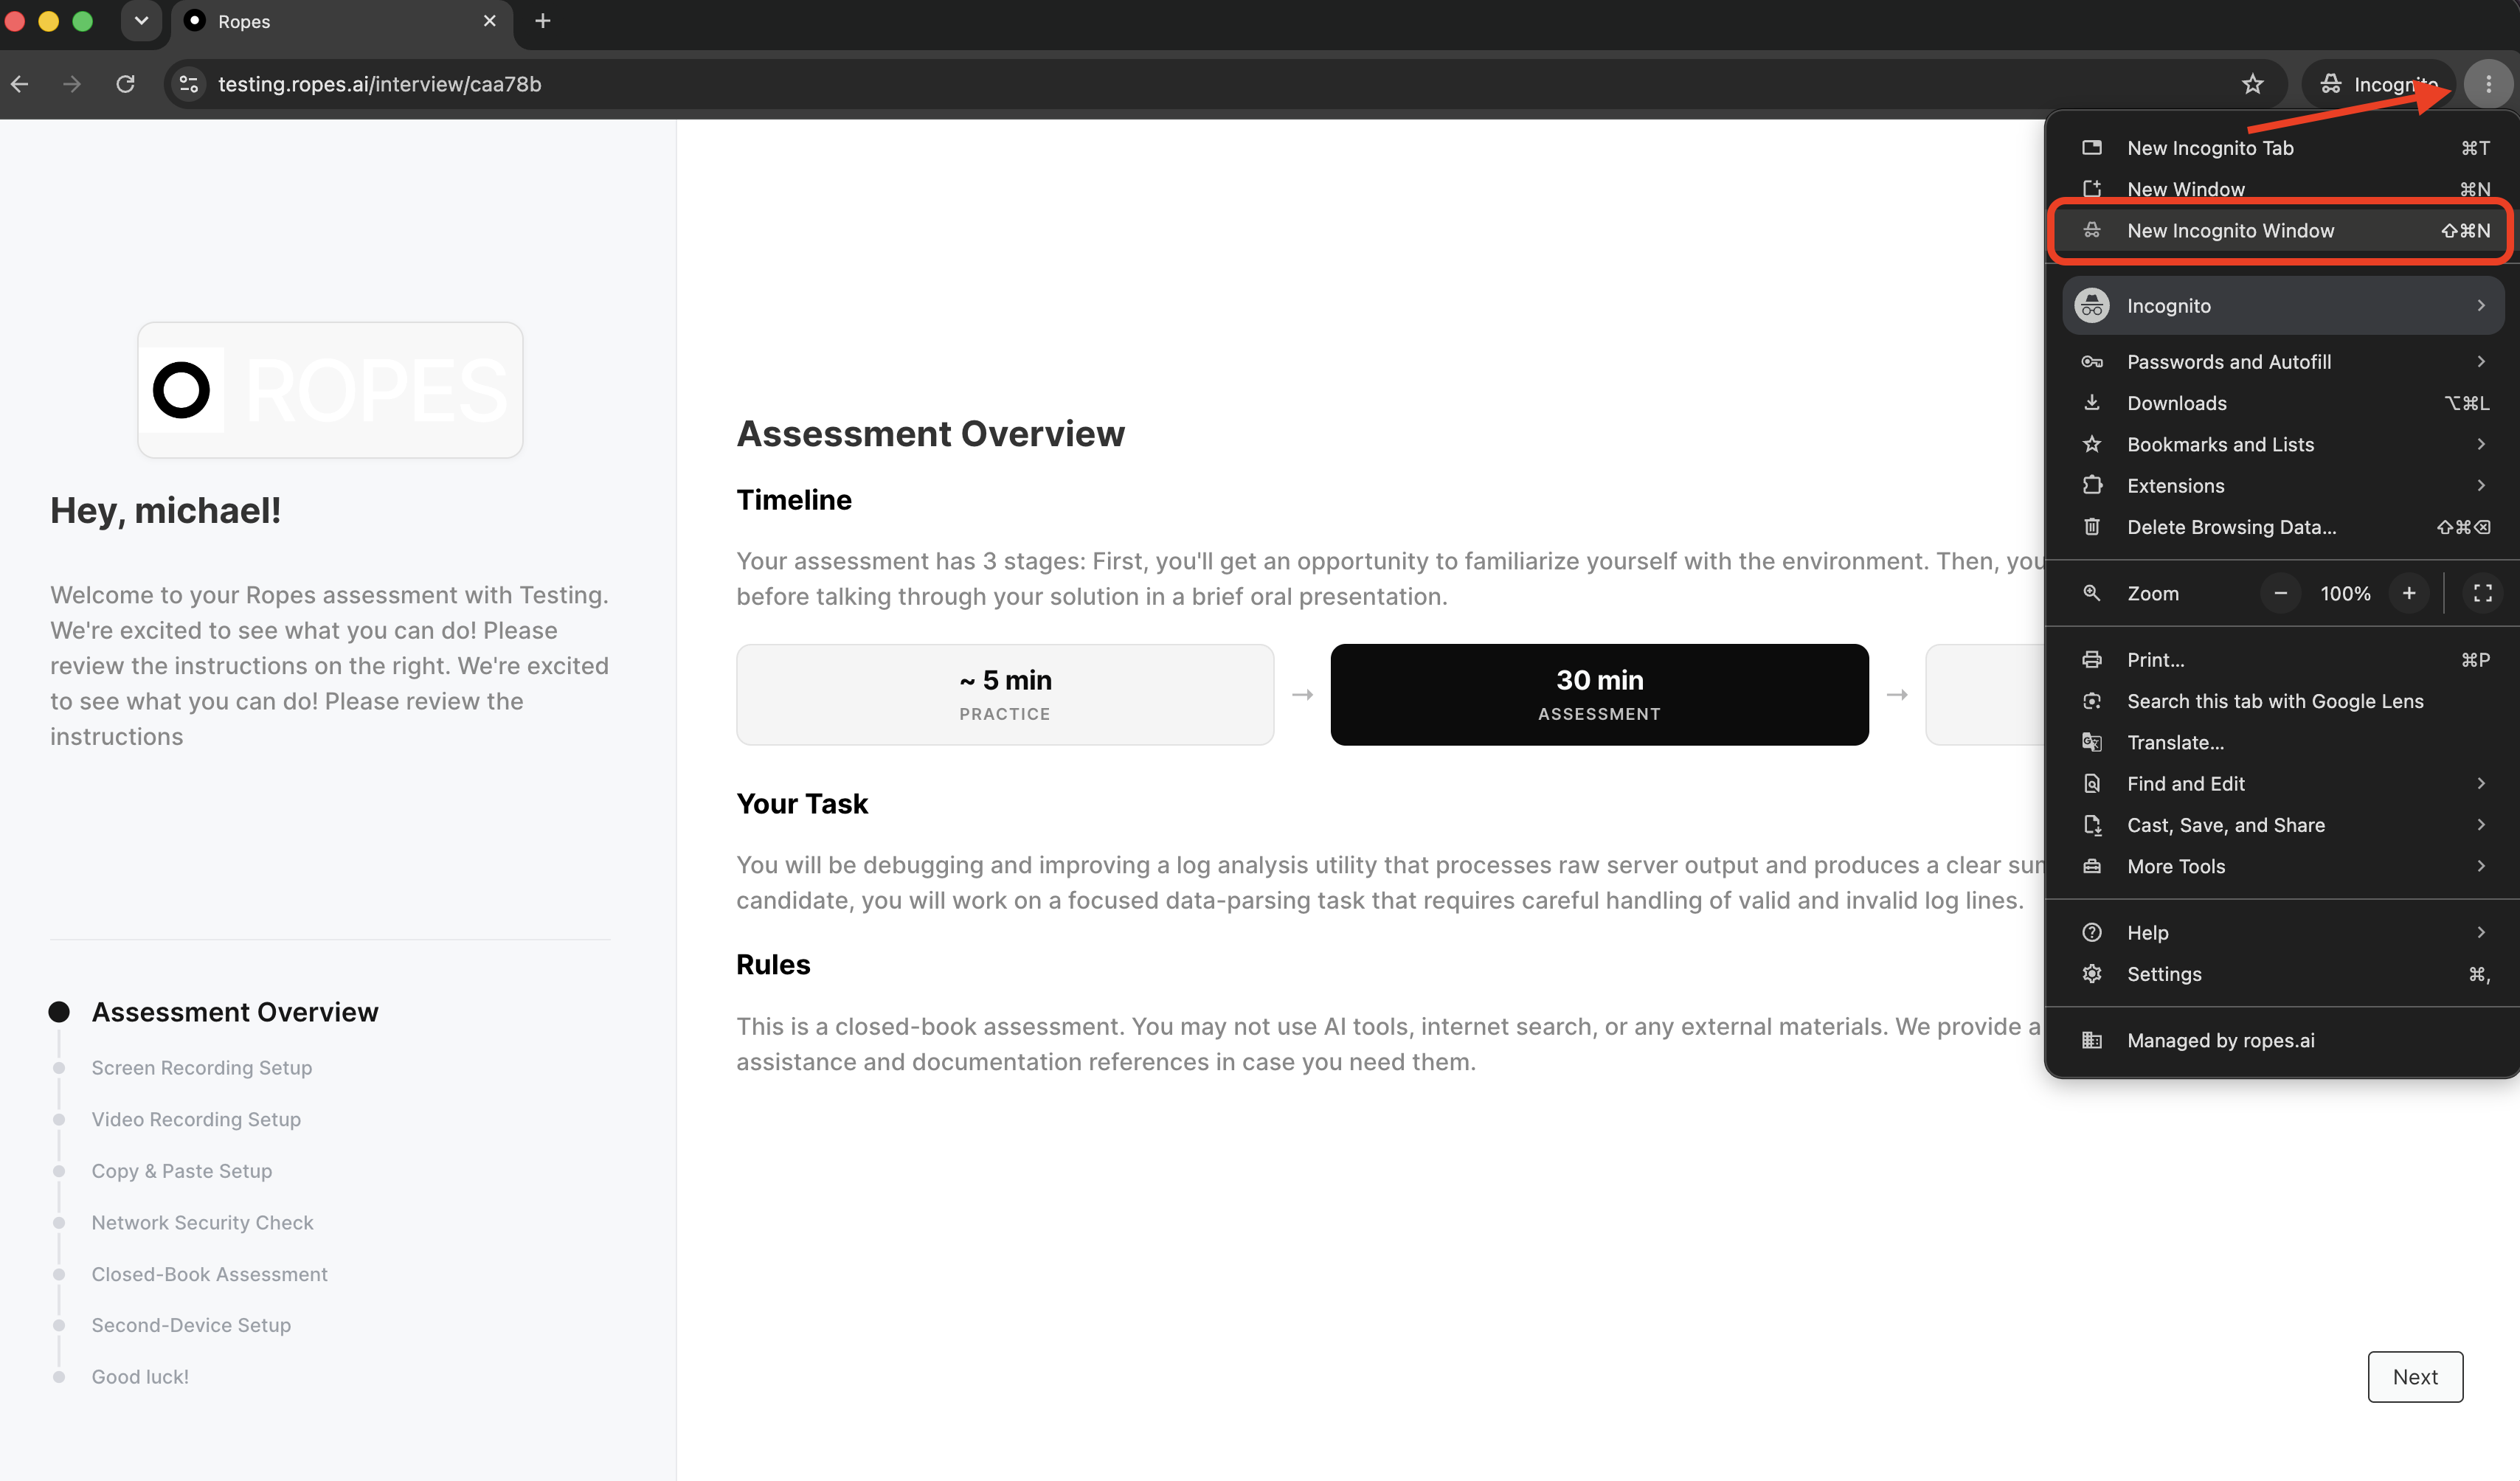
Select the three-dot menu in the upper-right corner of Chrome.
Select New Incognito Window. You can also press Ctrl-Shift-N on Windows or Command-Shift-N on Mac.
Paste the assessment link into the address bar and press Enter.
On the Ropes Video Recording Setup step, select Enable Camera & Microphone and allow both permissions again.
Microsoft Edge
Copy your Ropes assessment link from the current browser window.
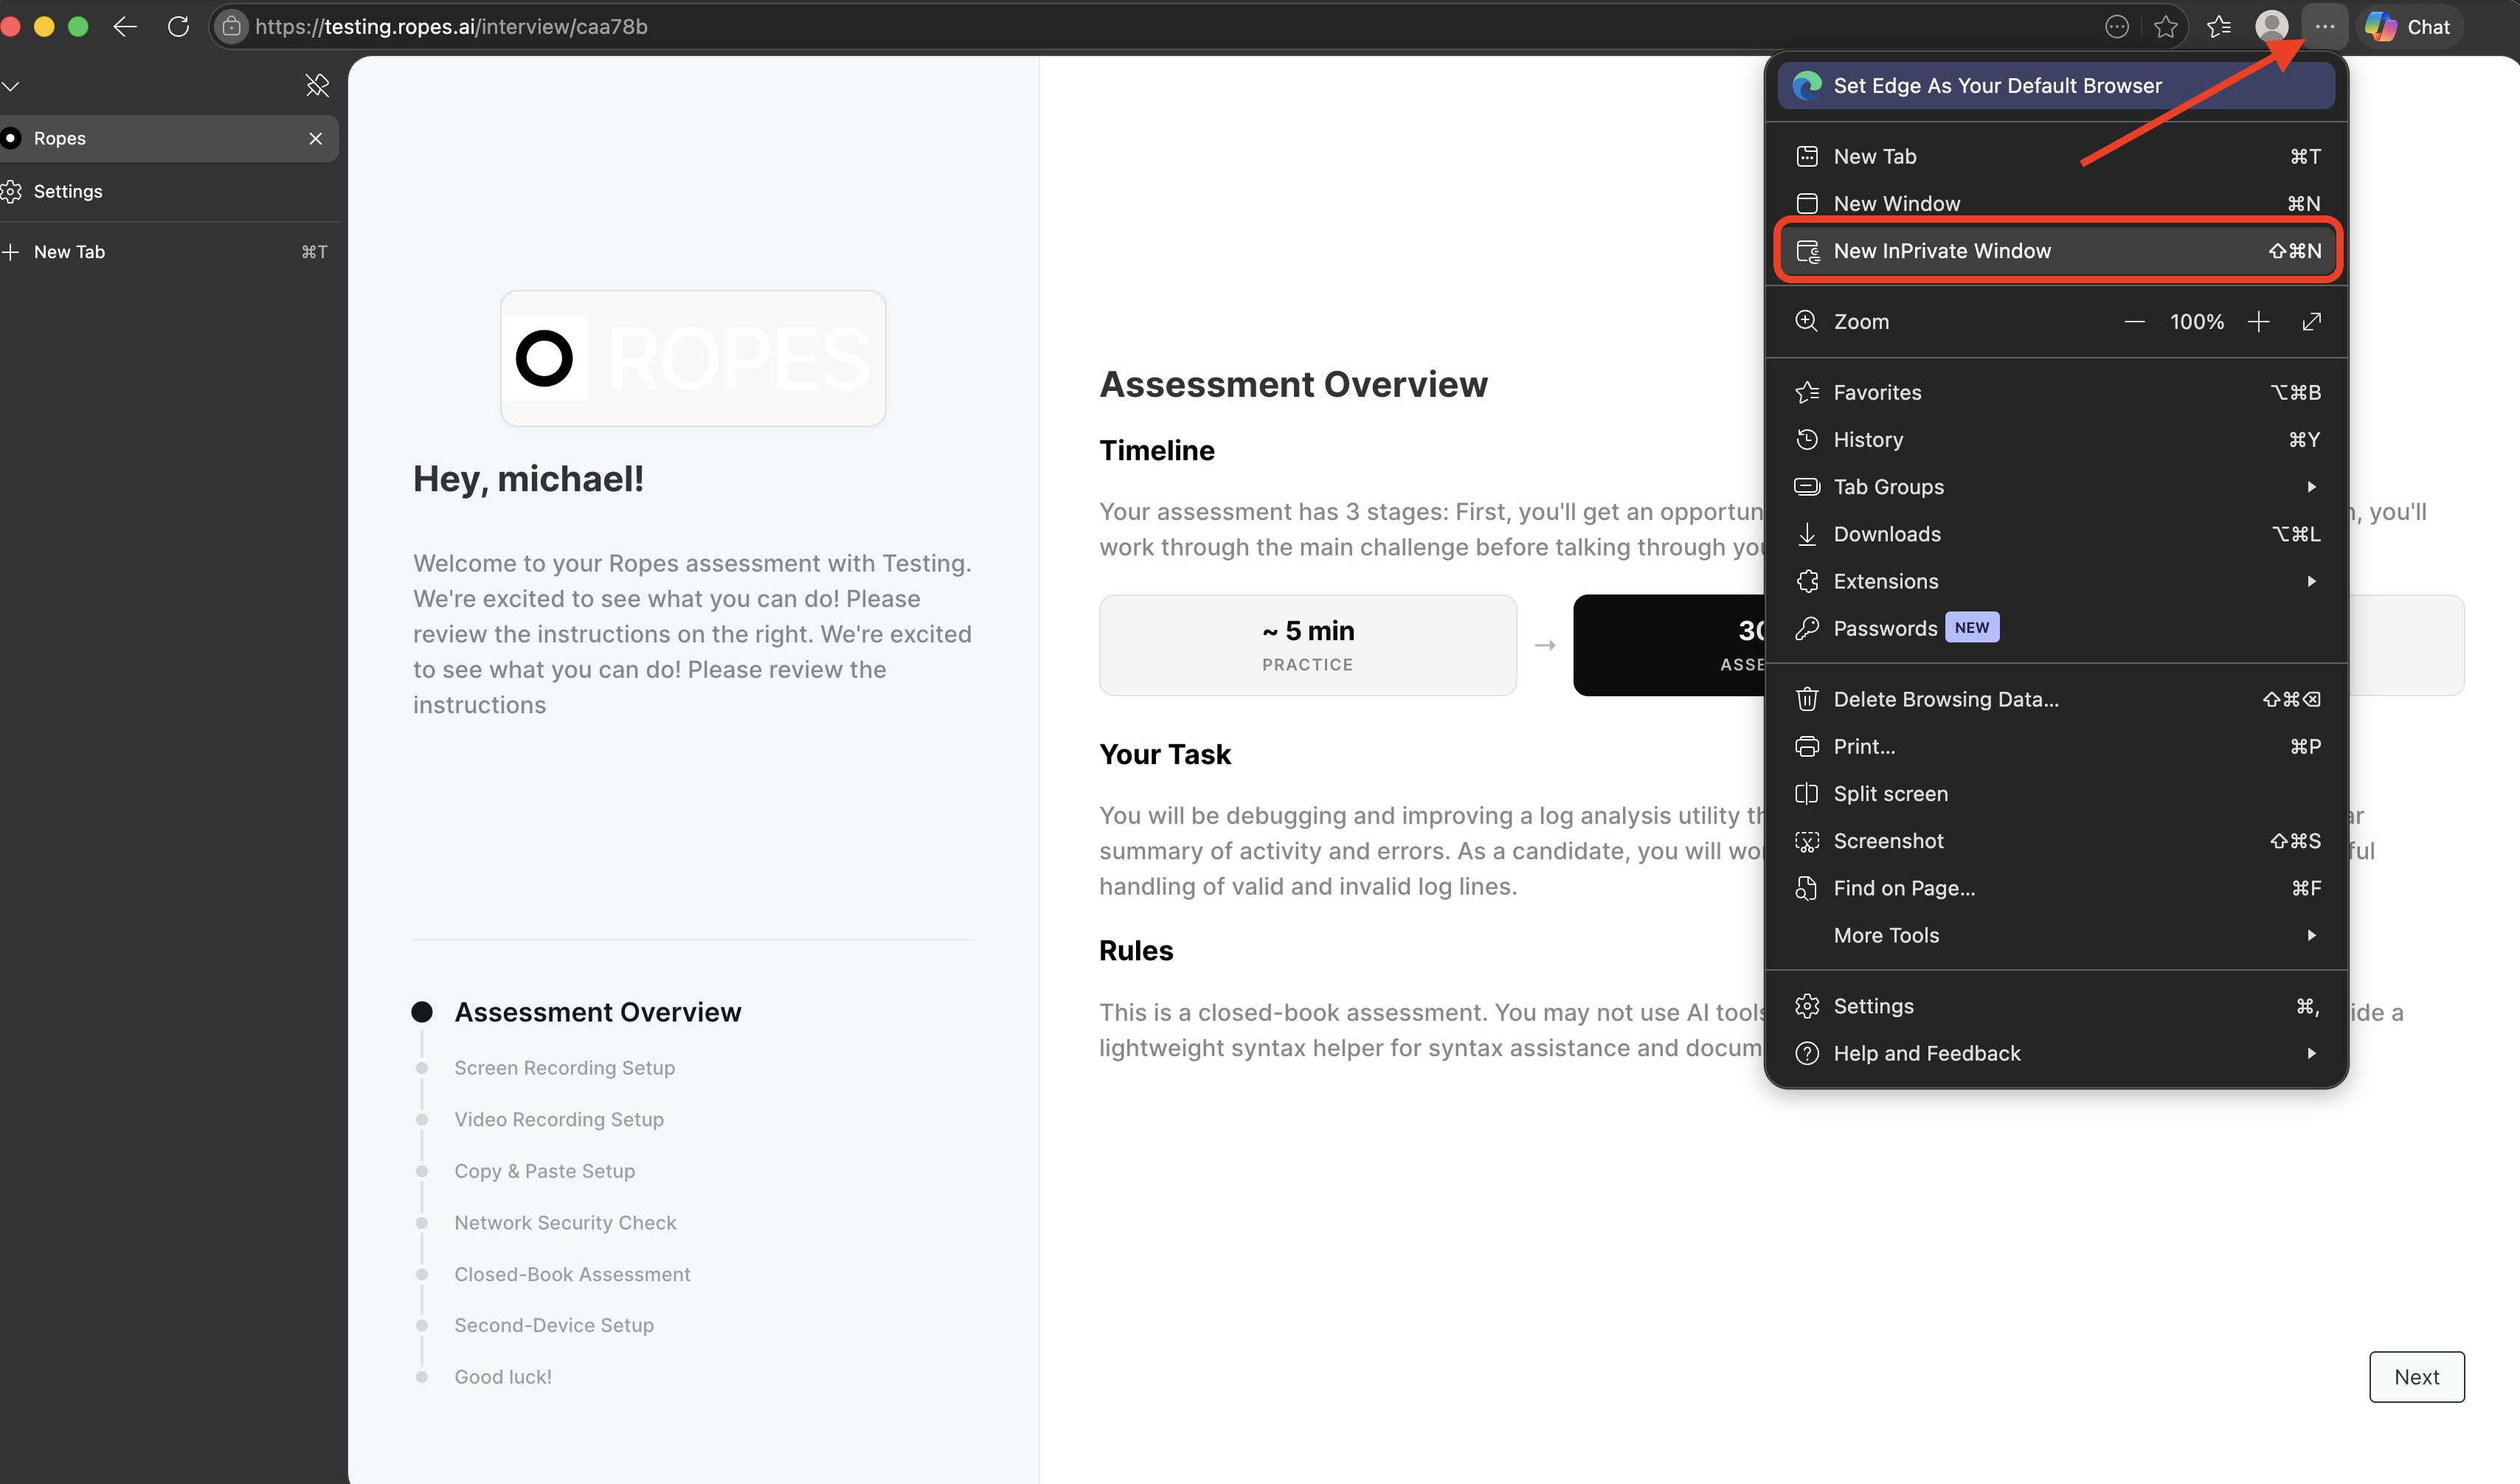
Select the three-dot menu in the upper-right corner of Edge.
Select New InPrivate Window. You can also press Ctrl-Shift-N on Windows or Command-Shift-N on Mac.
Paste the assessment link into the address bar and press Enter.
On the Ropes Video Recording Setup step, select Enable Camera & Microphone and allow both permissions again.
If the camera and microphone work in the private window, complete the Ropes video and audio tests there. If the assessment link does not open, return to the original tab and continue with the browser-permission steps below.
Allow access in Google Chrome
Change Chrome permission for the Ropes assessment page
Keep the assessment page open in Chrome.
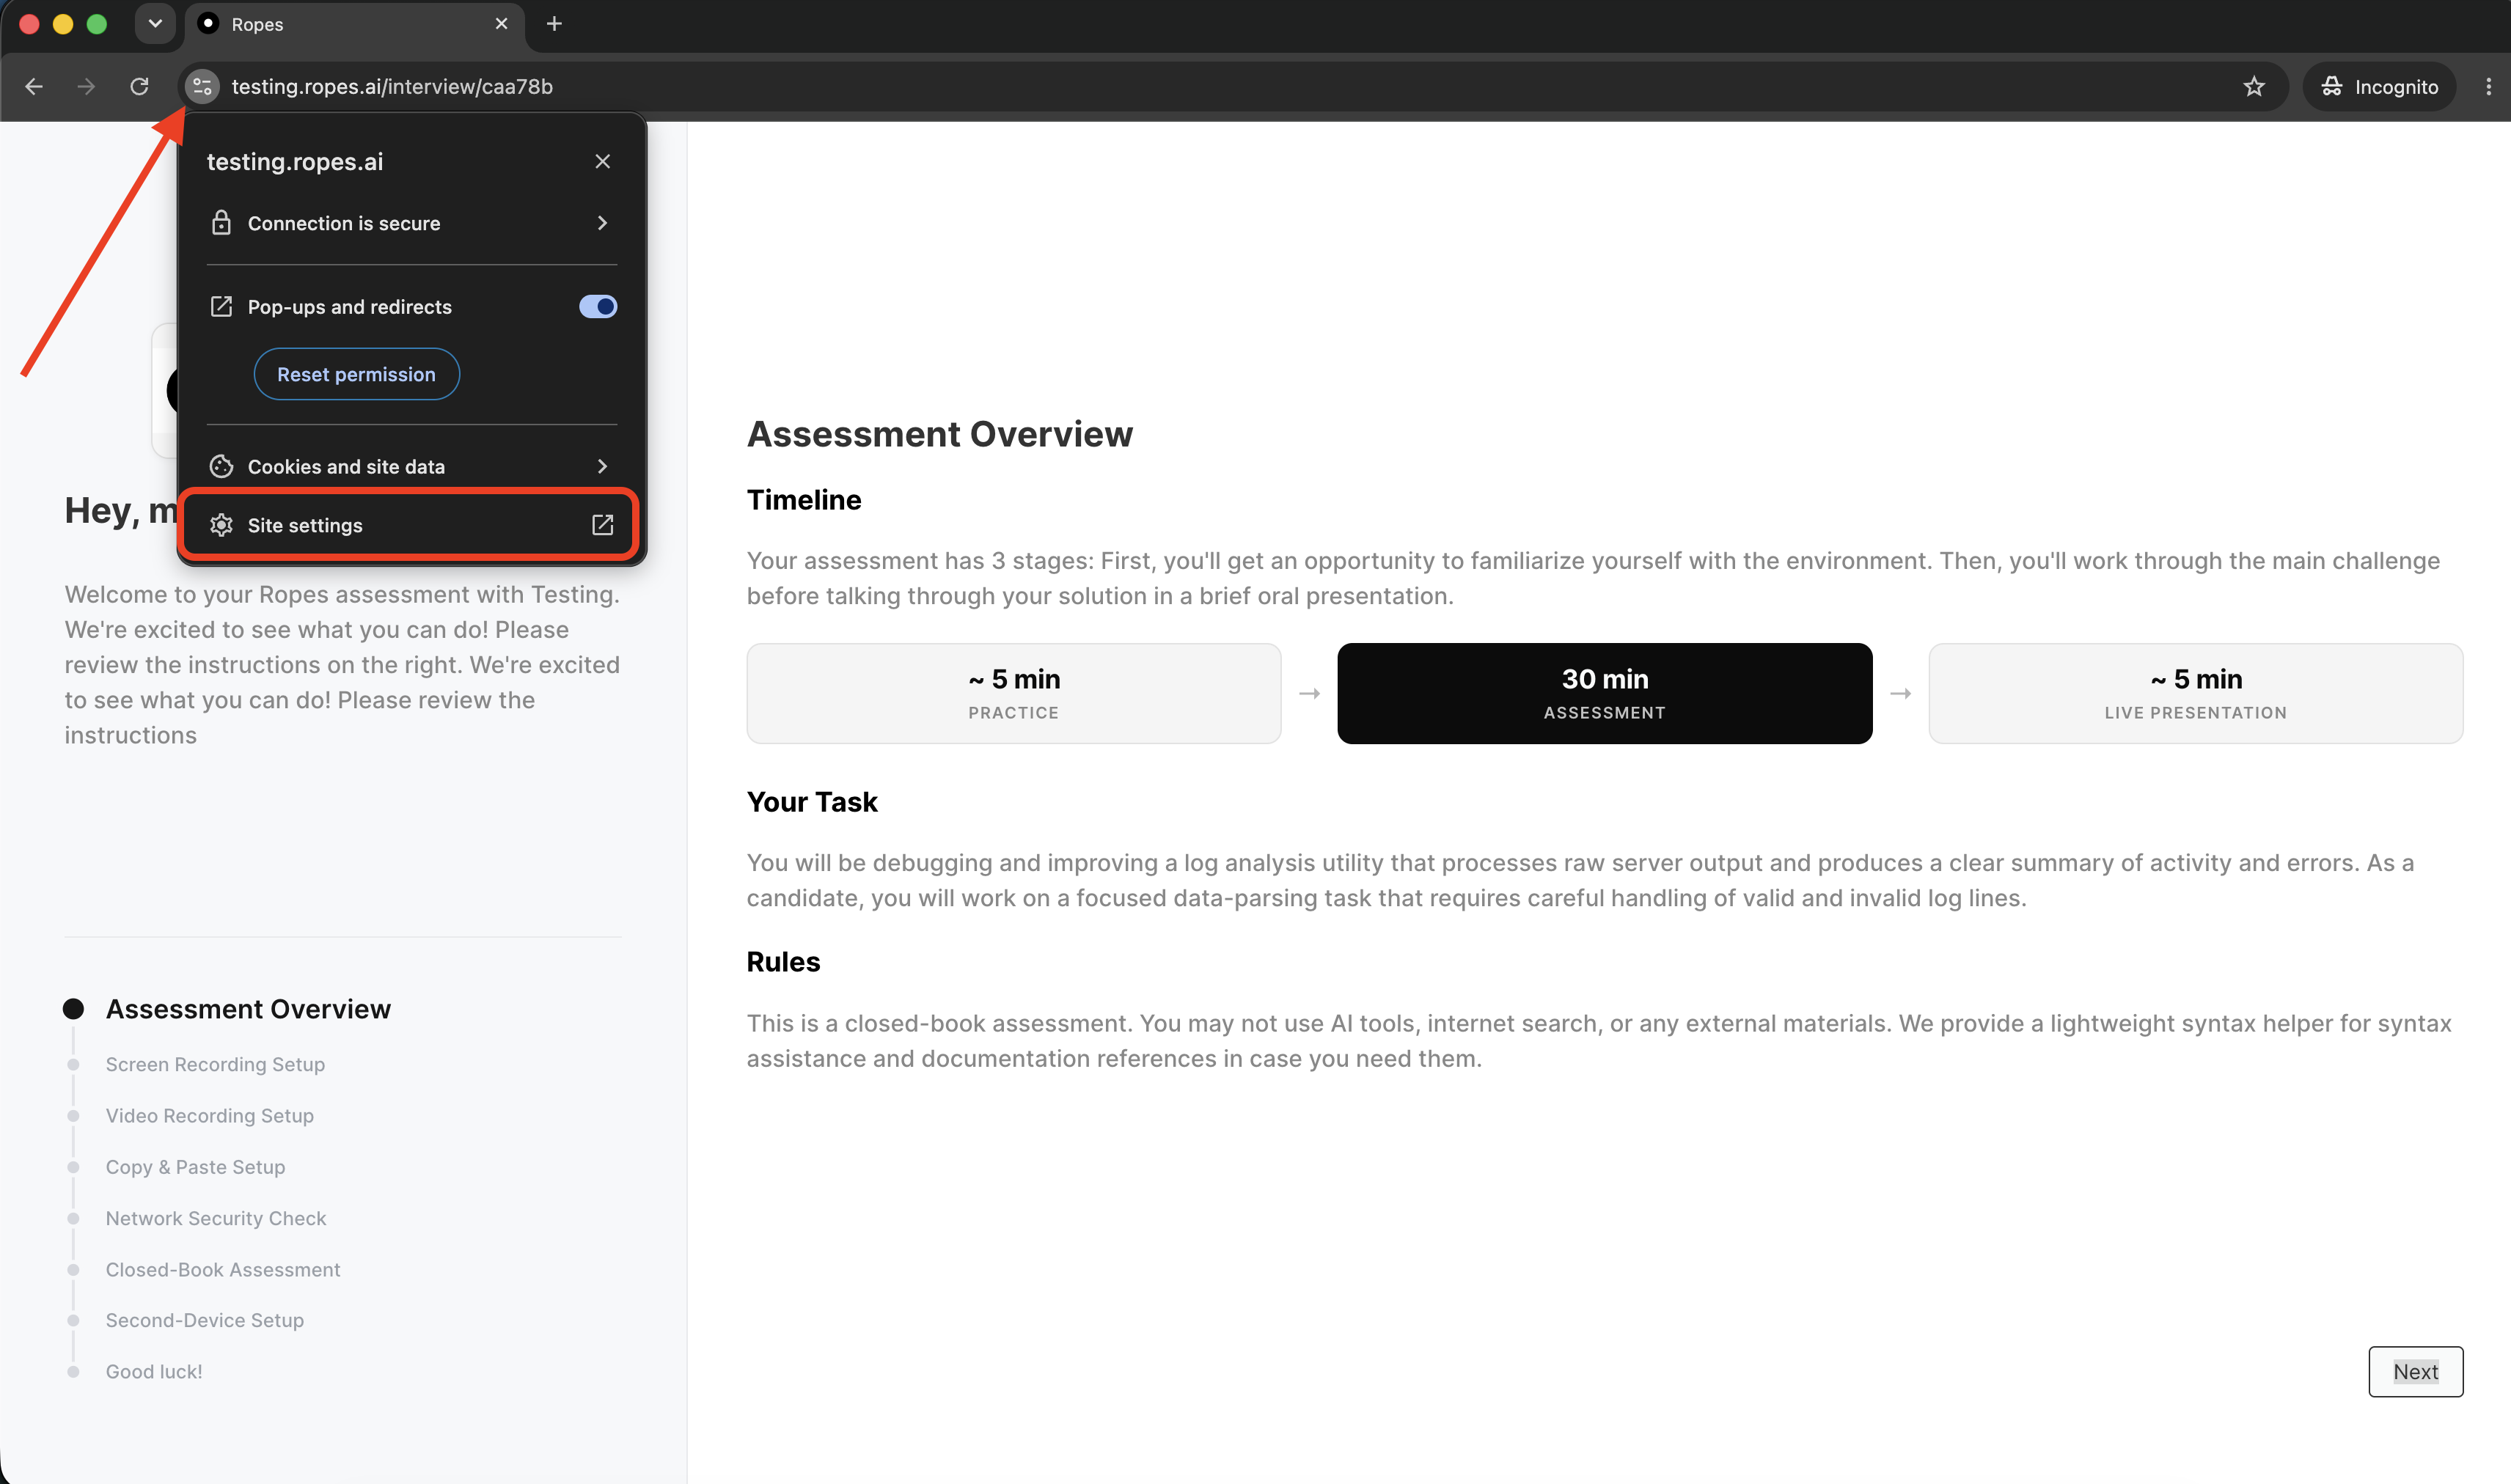
At the left end of the address bar, select the View site information icon. It looks like two horizontal sliders; older Chrome versions may show a lock.
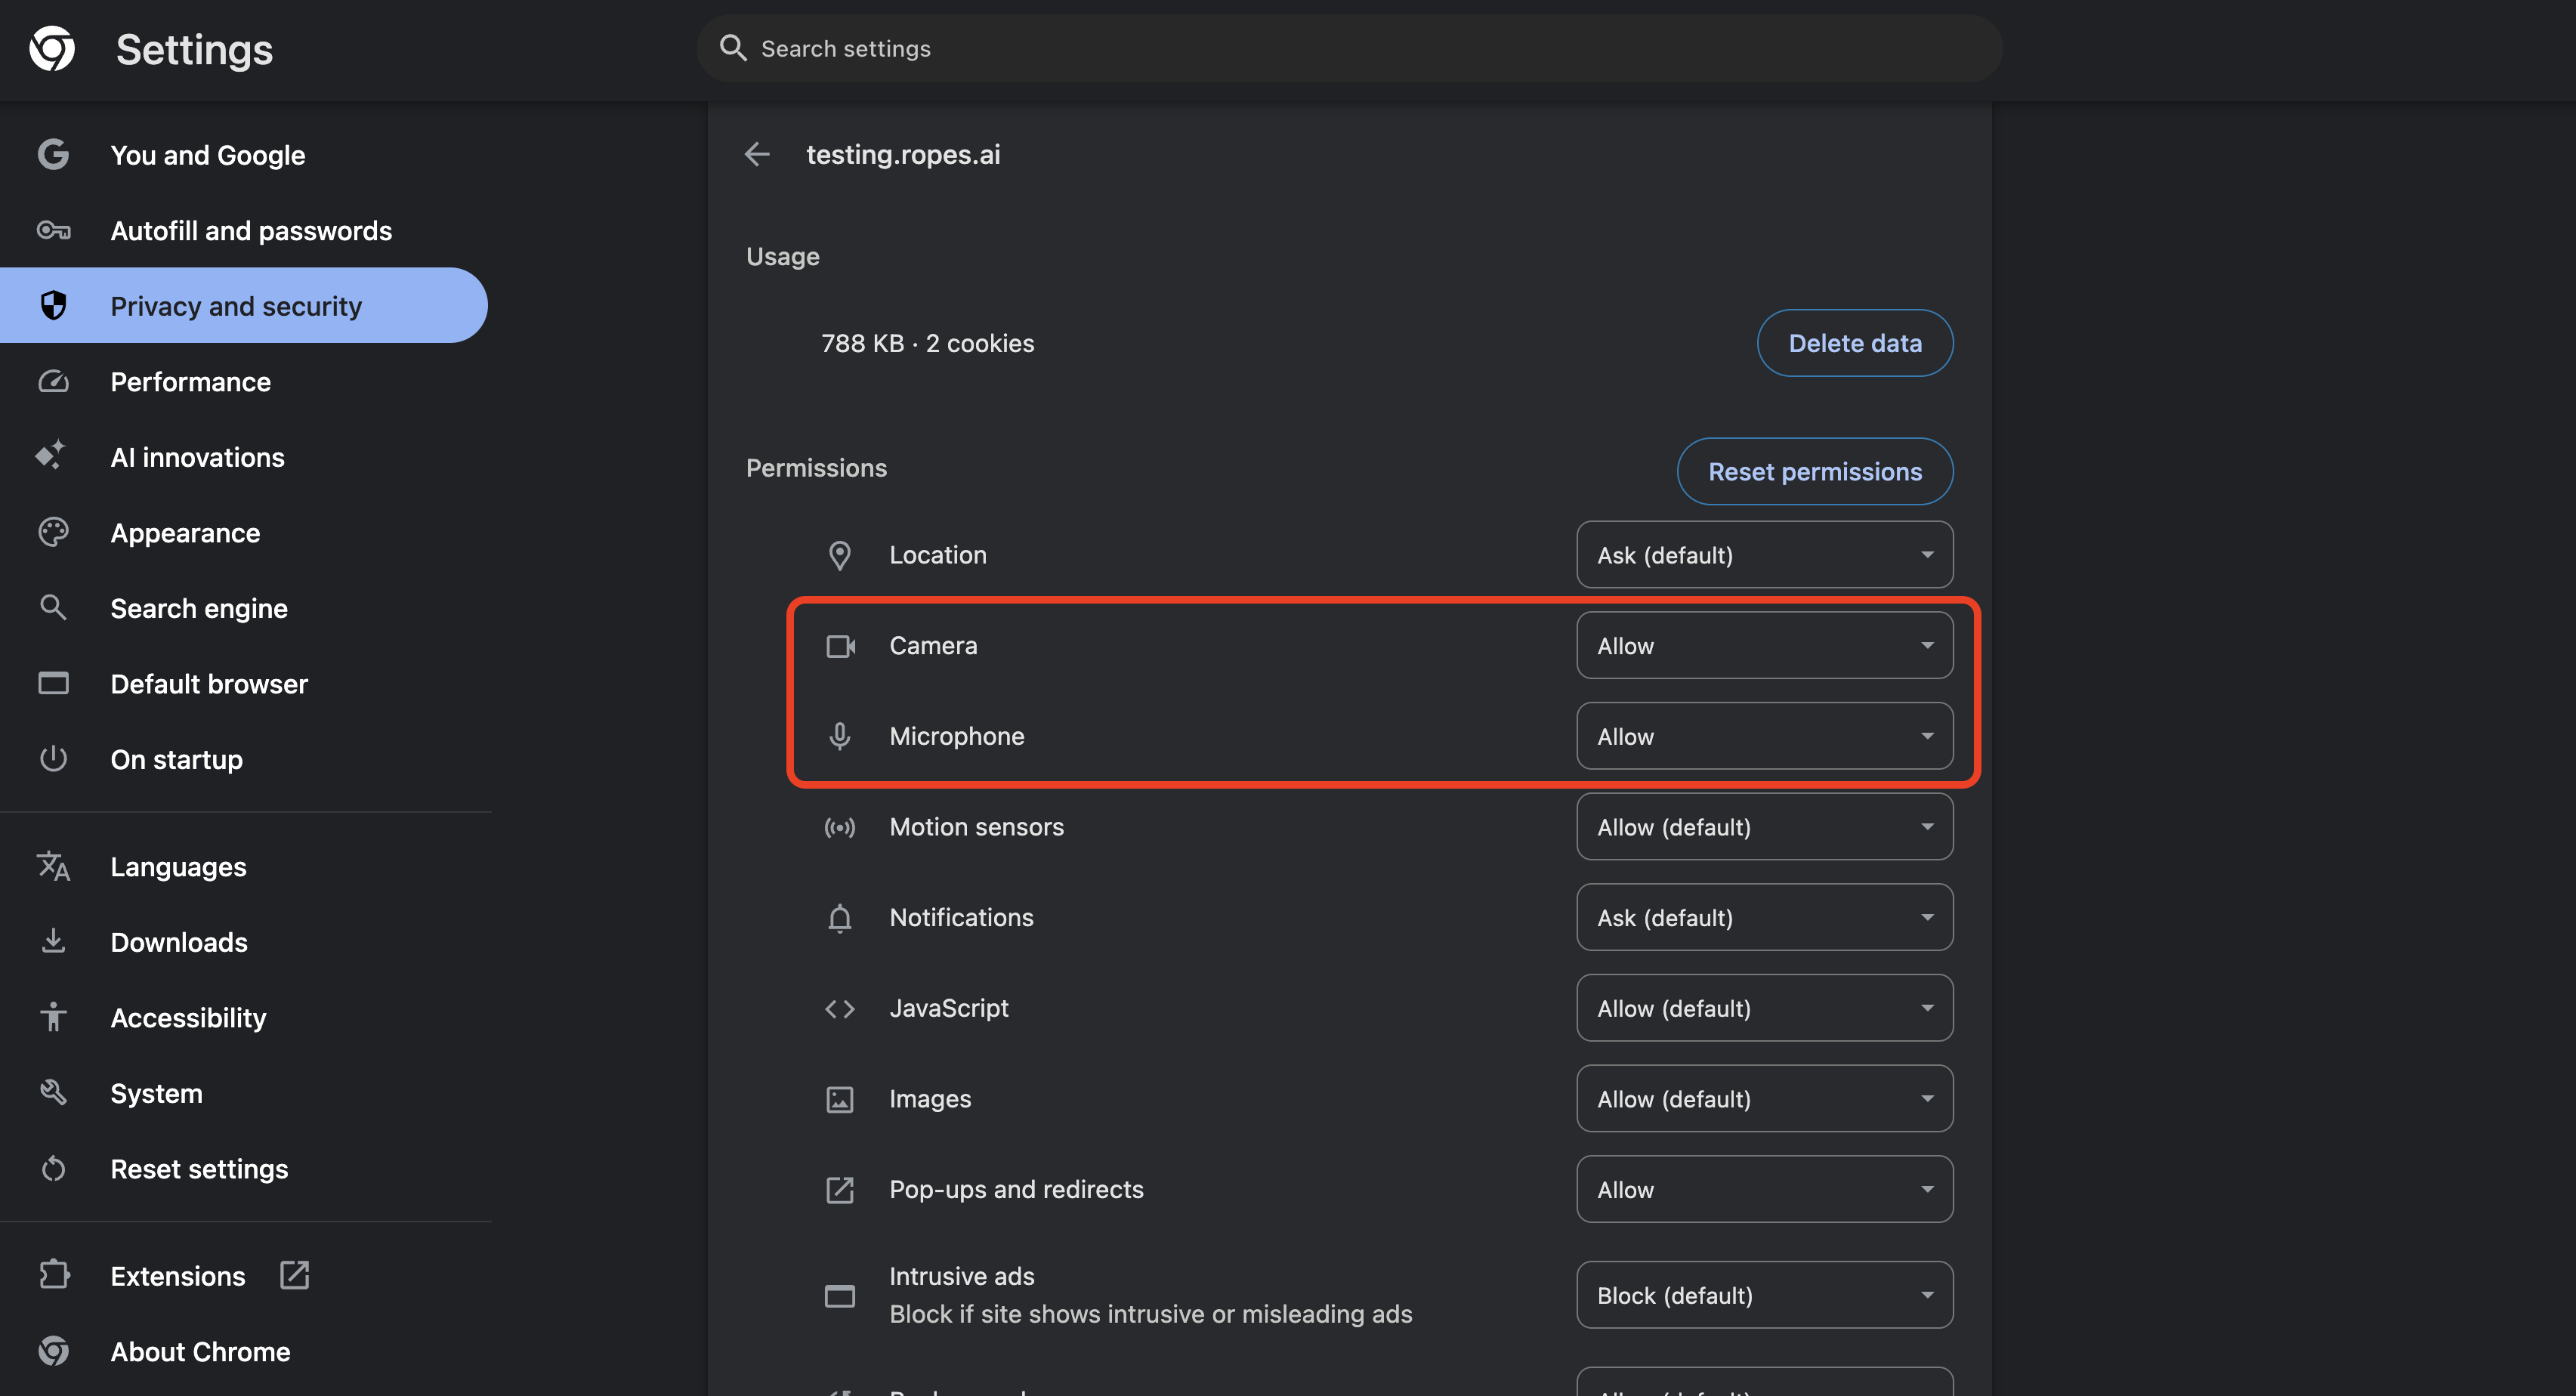
Set Camera and Microphone to Allow. If they are not listed, select Site settings.
Return to Ropes and select Reload when Chrome offers it. Otherwise, refresh the page.
Select Enable Camera & Microphone again.
Chrome site menu: select Site settings.
Chrome permission controls: set both Camera and Microphone to Allow.
Check Chrome's full camera and microphone settings
Select the three-dot menu in the upper-right corner of Chrome.
Select Settings → Privacy and security → Site settings.
Under Permissions, select Camera.
Choose Sites can ask to use your camera. Use the device menu to select the physical camera you want to use.
Under Not allowed to use your camera, select the Ropes assessment site if it appears and change it to Allow.
Return to Site settings, select Microphone, and repeat the same checks. Choose the physical microphone or headset you want to use.
Chrome Settings path: select Privacy and security, then Site settings.
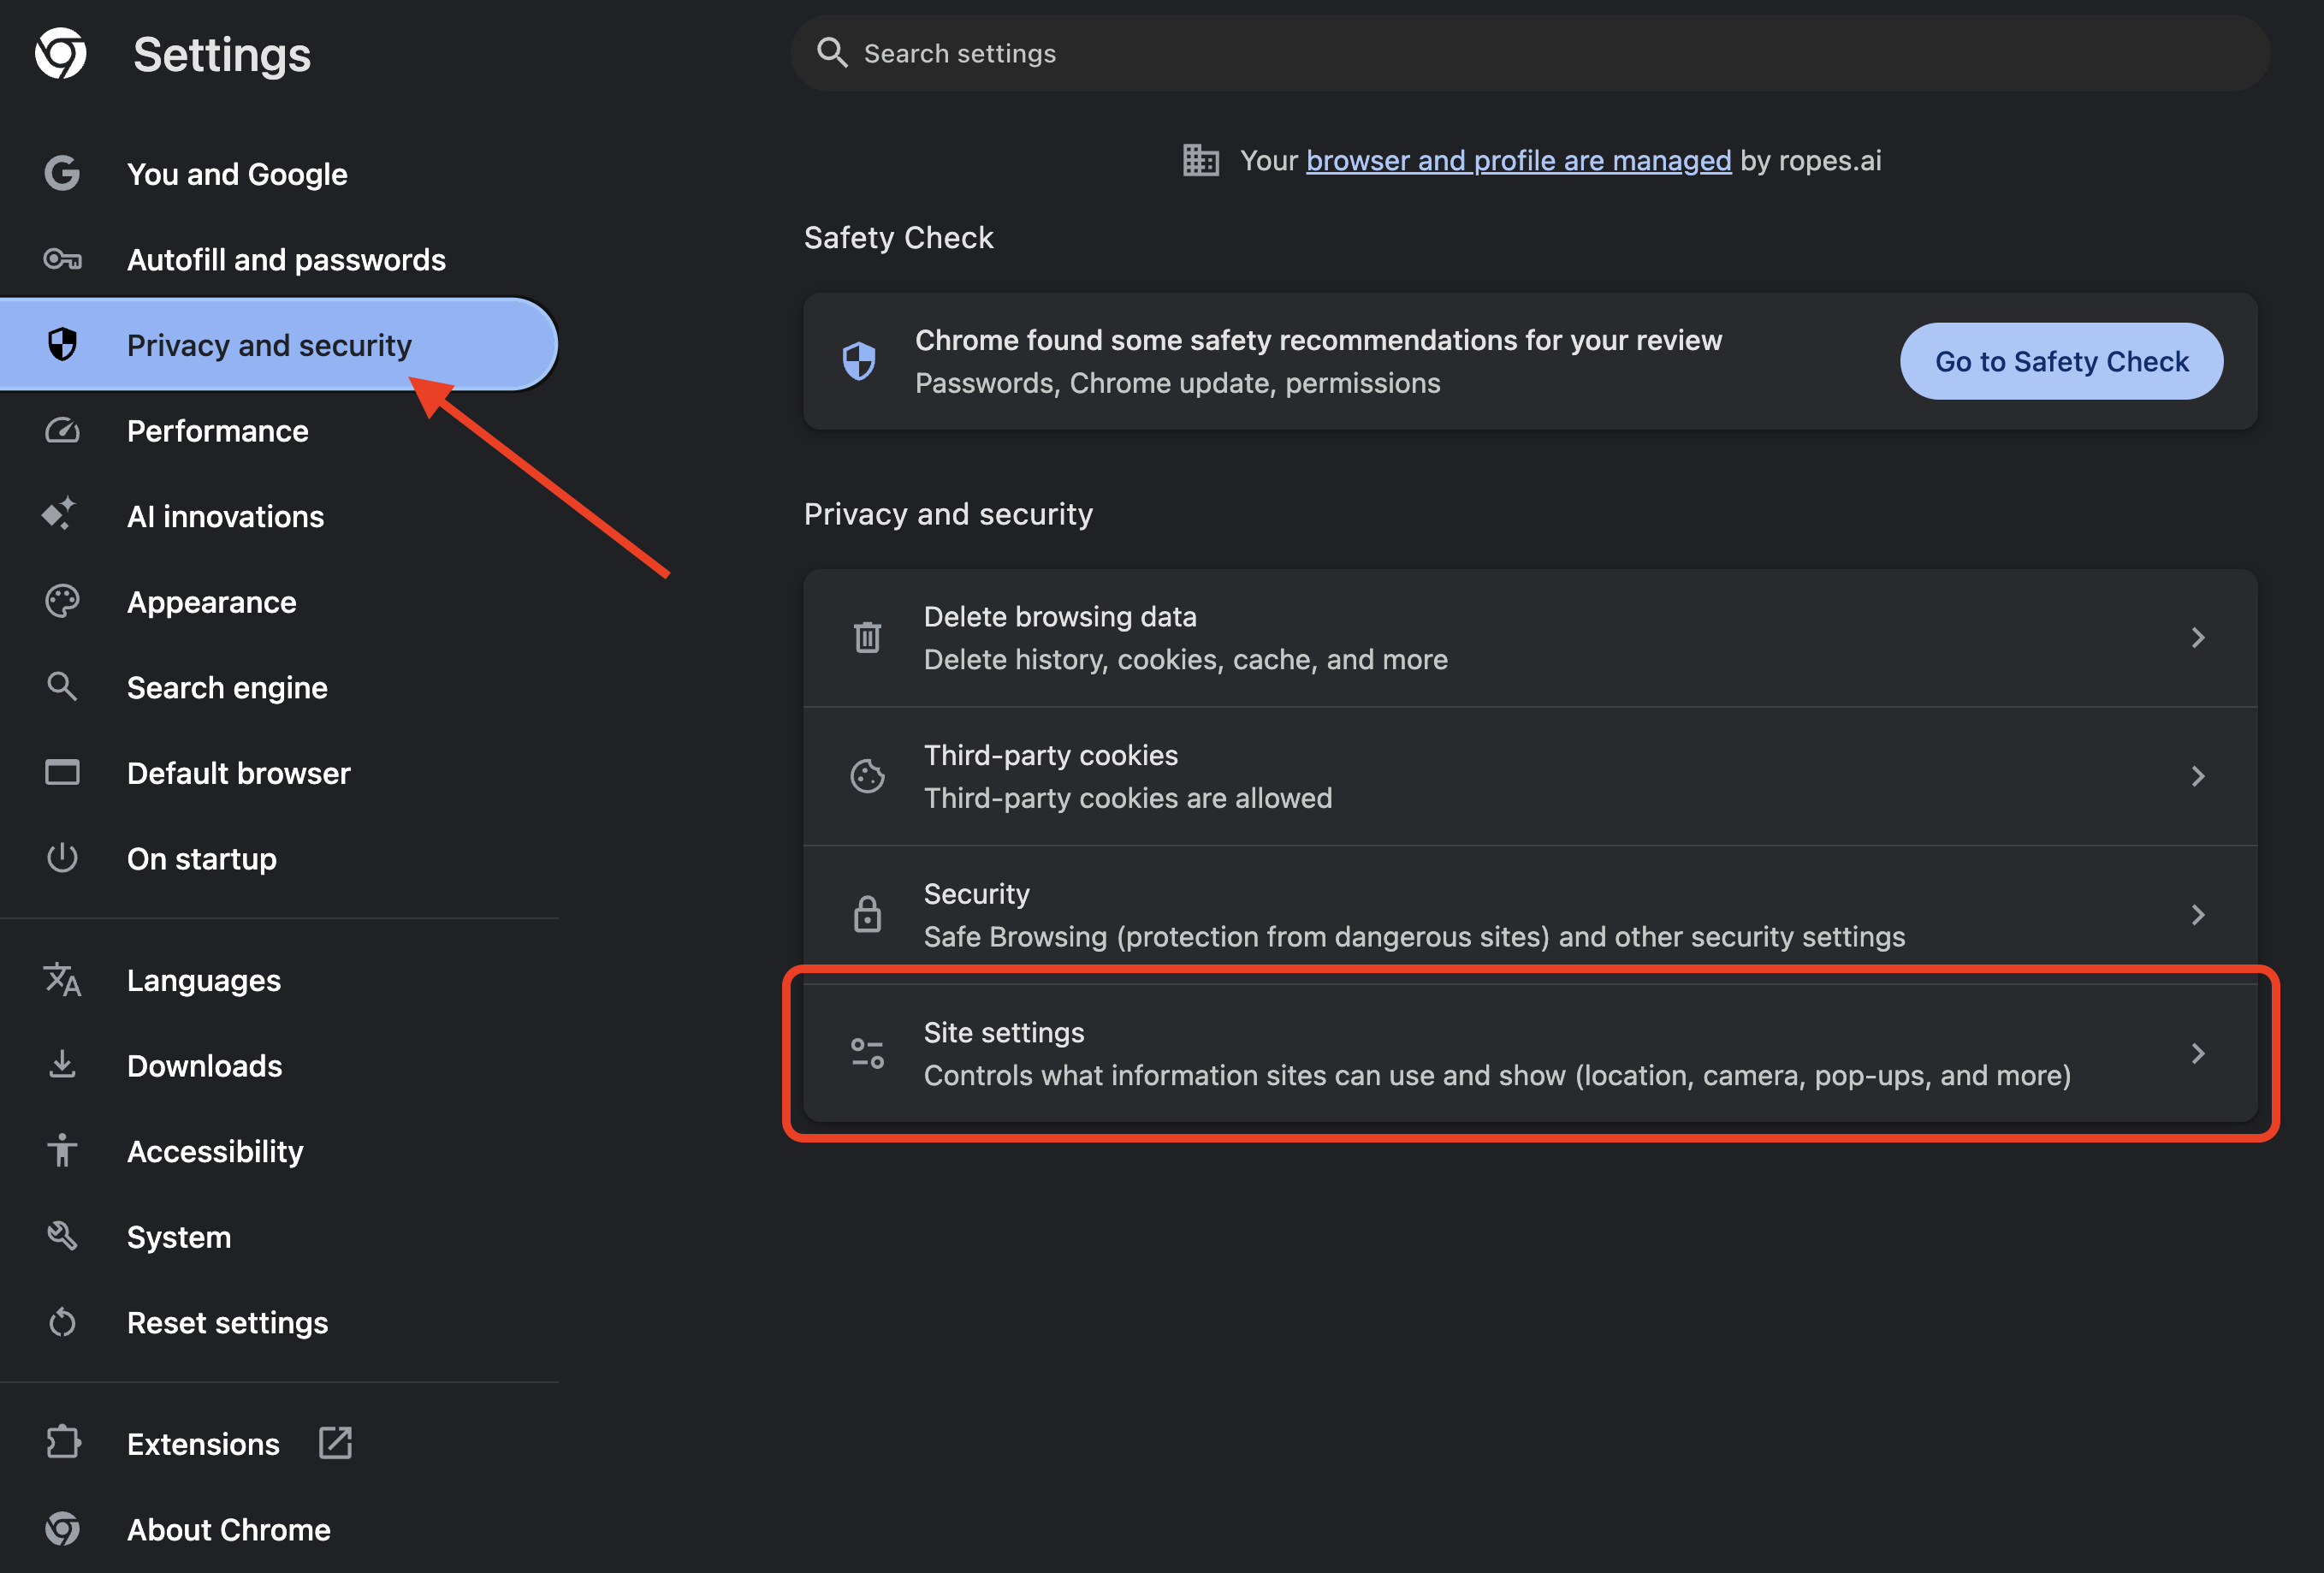
For a shortcut, paste chrome://settings/content/camera or chrome://settings/content/microphone into the Chrome address bar and press Enter.
Allow access in Microsoft Edge
Change Edge permission for the Ropes assessment page
Keep the assessment page open in Edge.
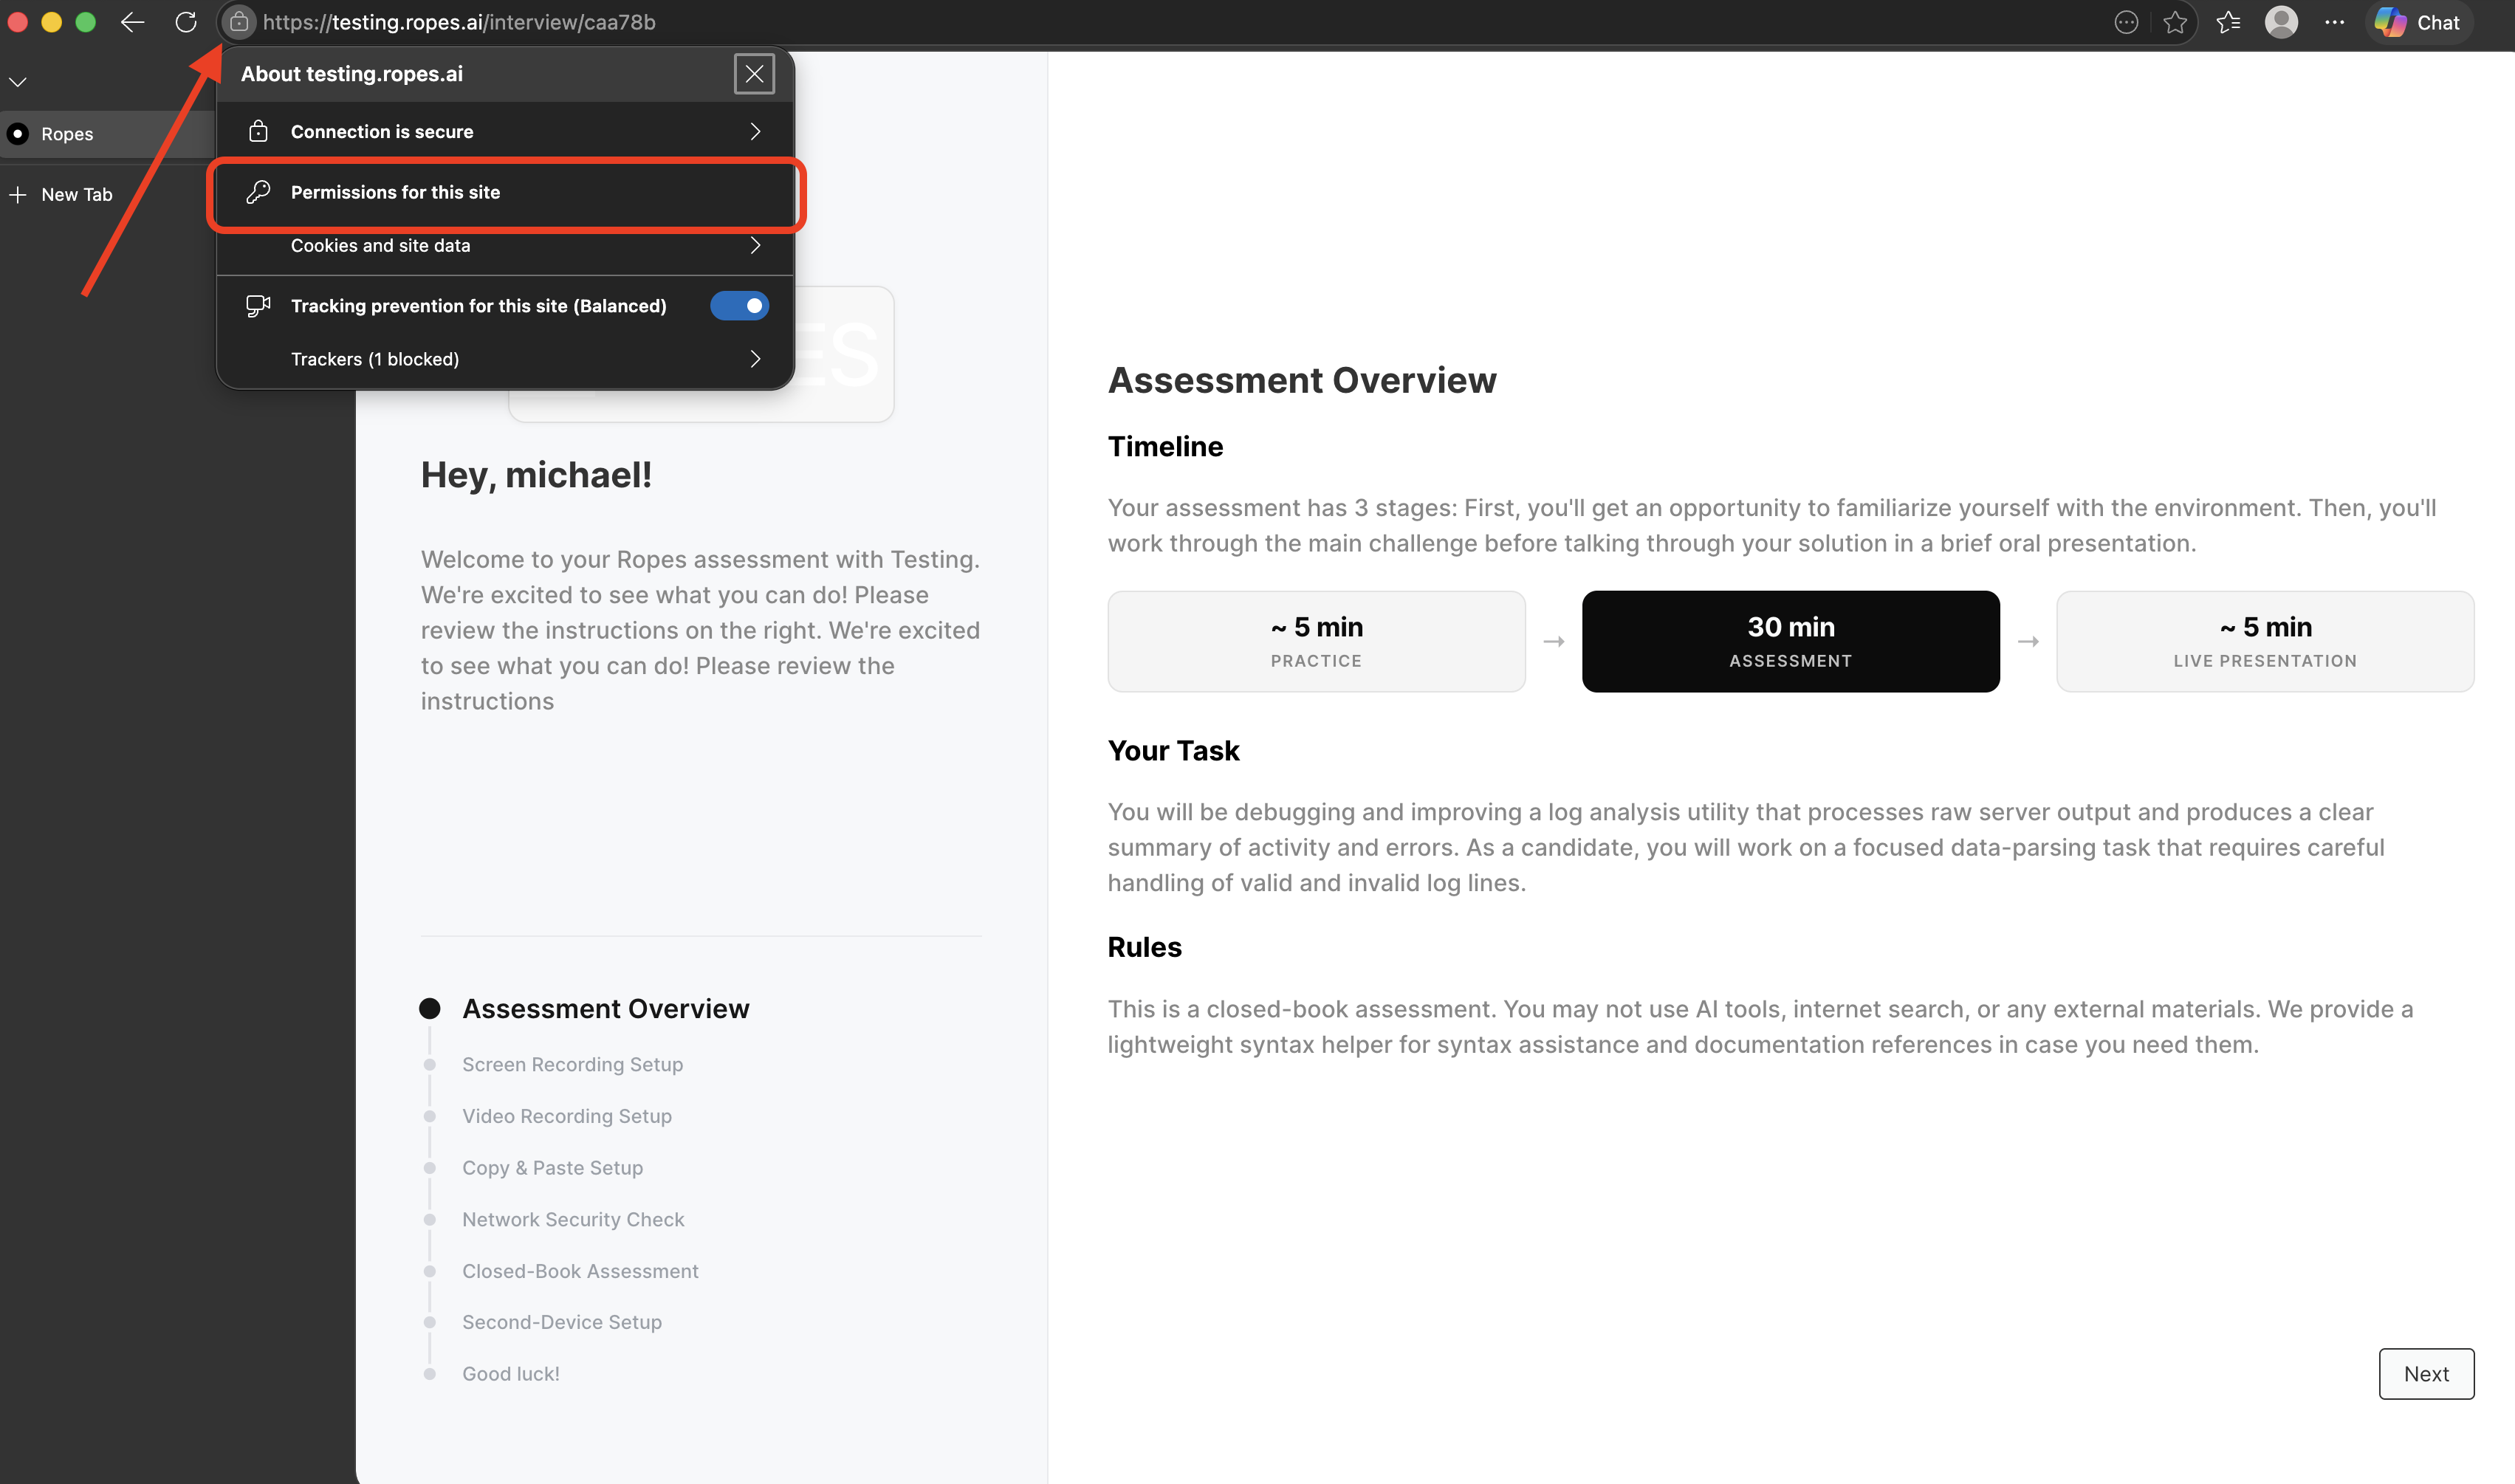
At the left end of the address bar, select the View site information icon. It may look like two horizontal sliders or a lock.
Select Permissions for this site.
Set Camera and Microphone to Allow.
Return to Ropes, refresh the page, and select Enable Camera & Microphone again.
Edge site menu: select Permissions for this site.
Check Edge's full site settings
Select the three-dot menu in the upper-right corner of Edge, then select Settings.
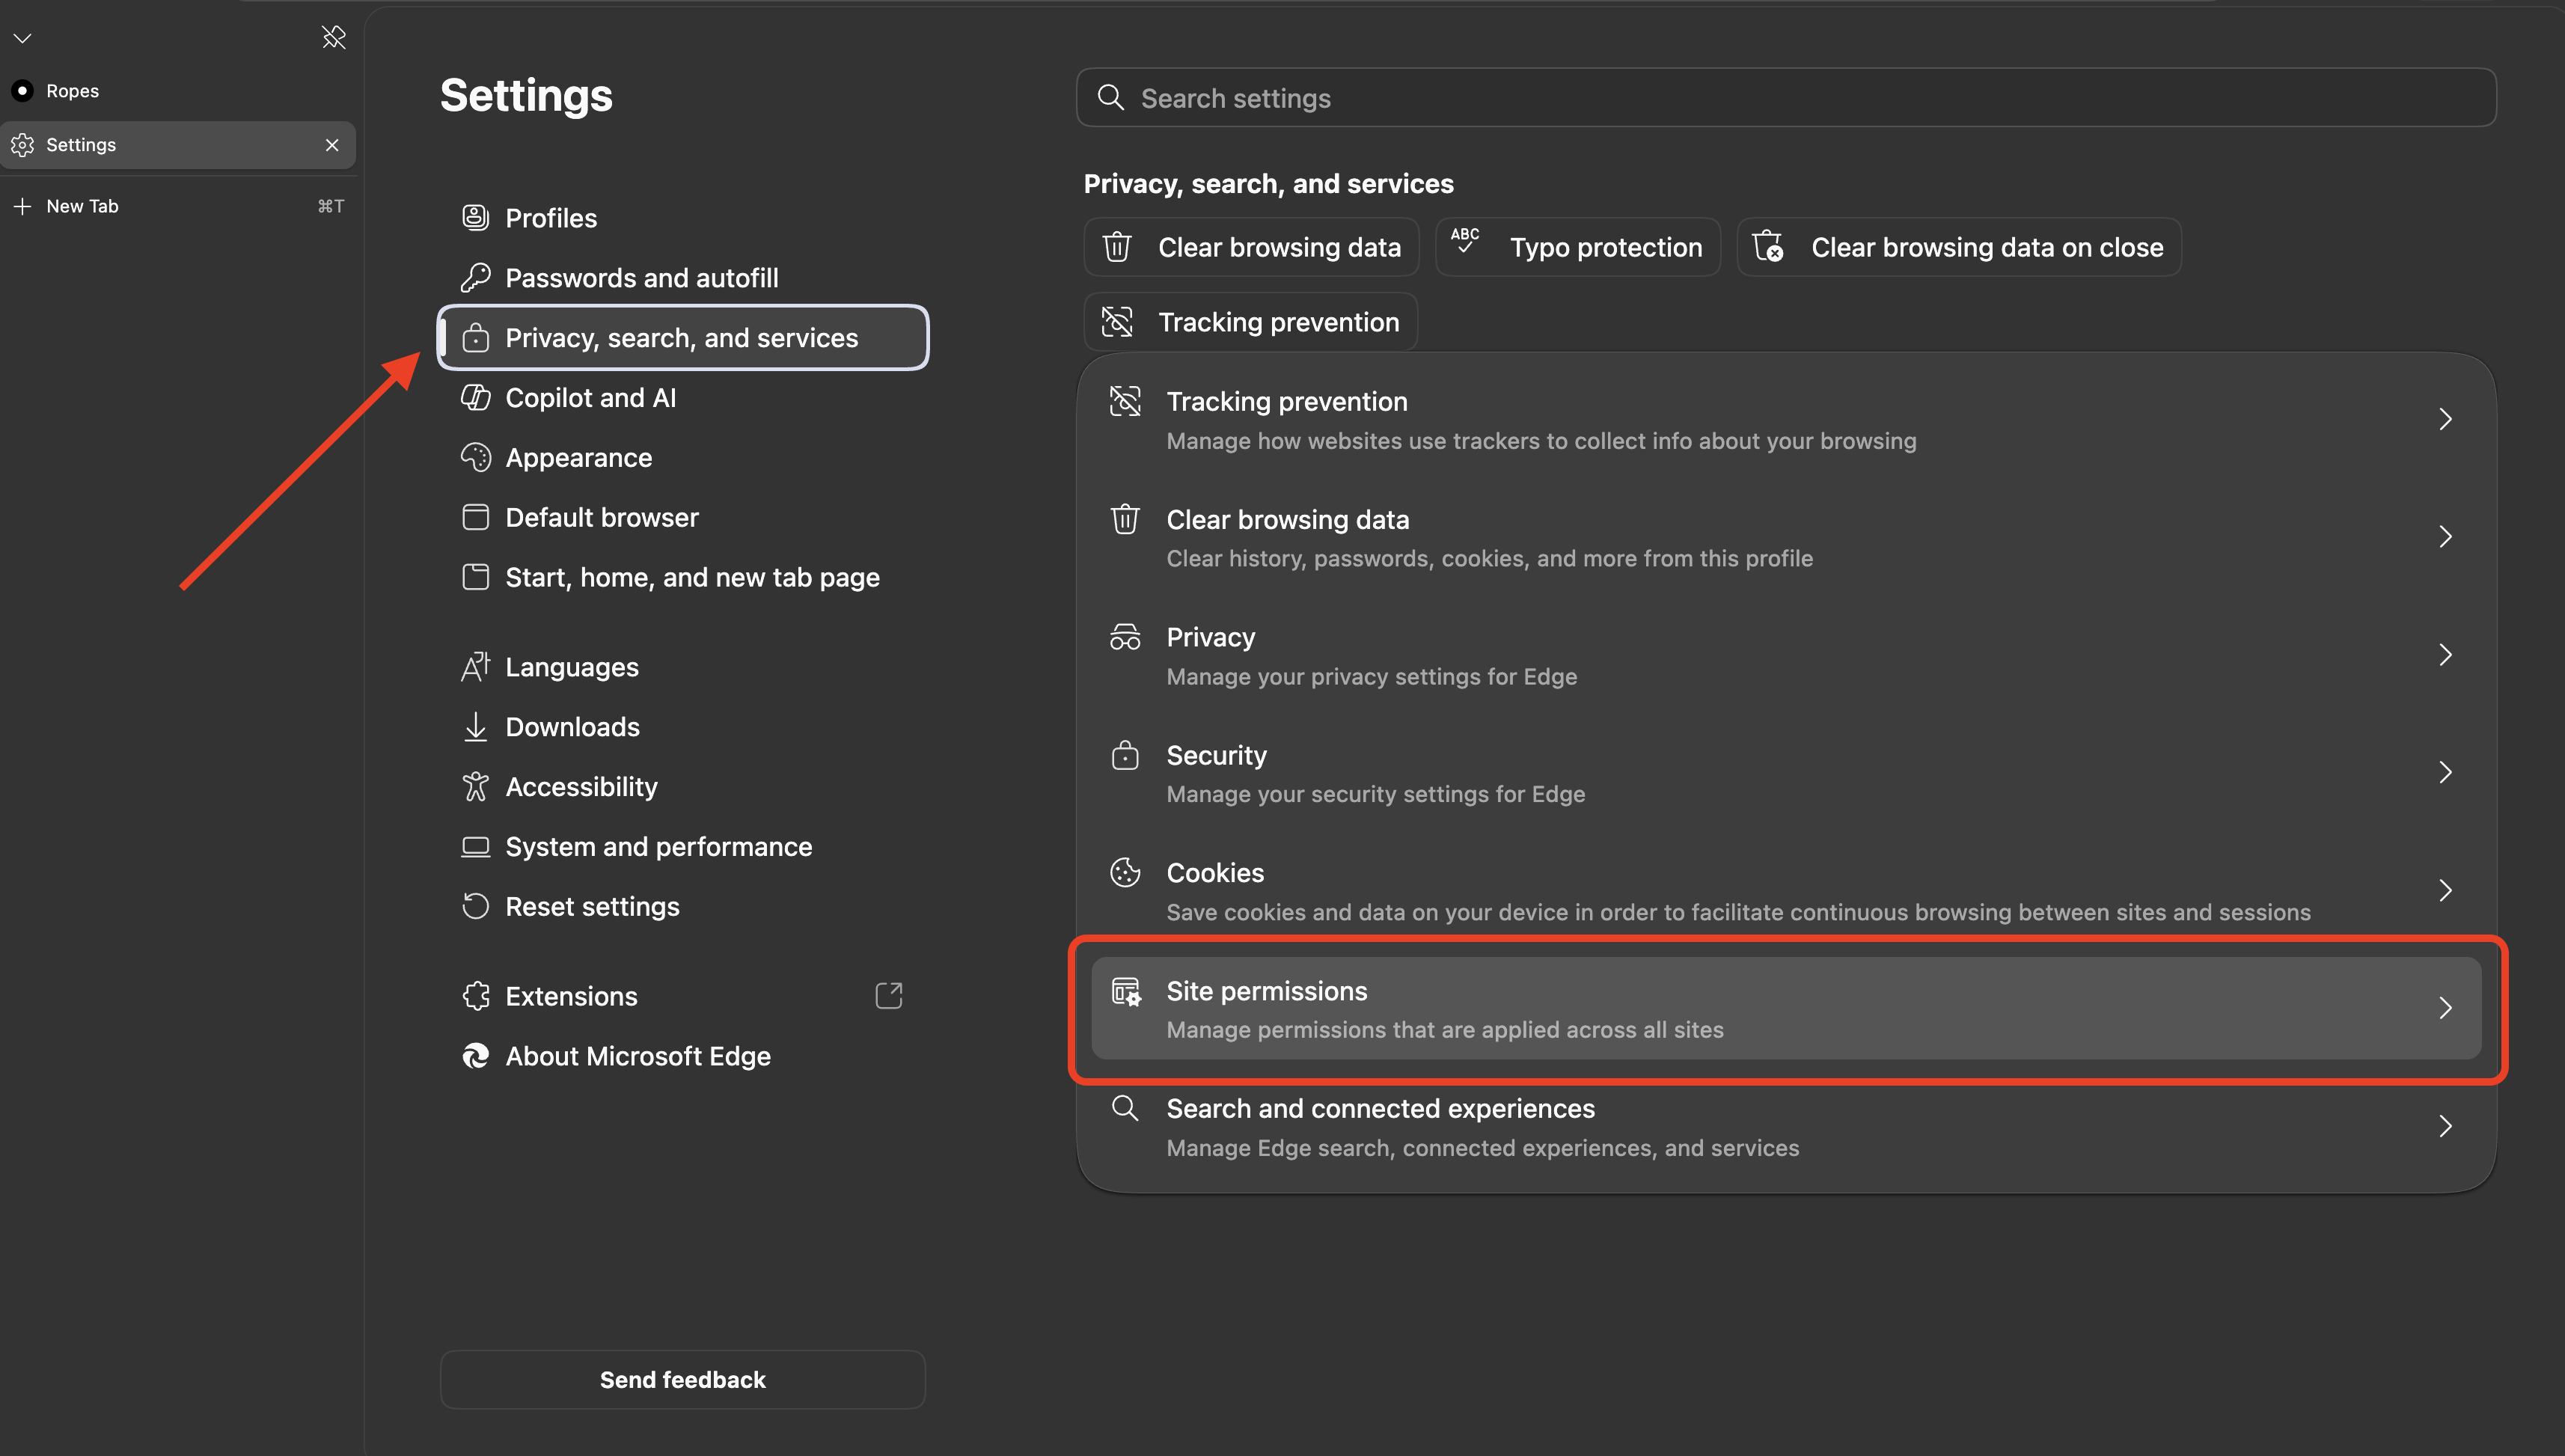
Select Privacy, search, and services → Site permissions → All sites.
Select the Ropes assessment site and set Camera and Microphone to Allow.
Open the Camera and Microphone site-permission pages and confirm the correct physical devices are selected.
Edge Settings path: select Privacy, search, and services, then Site permissions.
Edge permission controls: use the Camera and Microphone dropdowns shown below and change both to Allow.
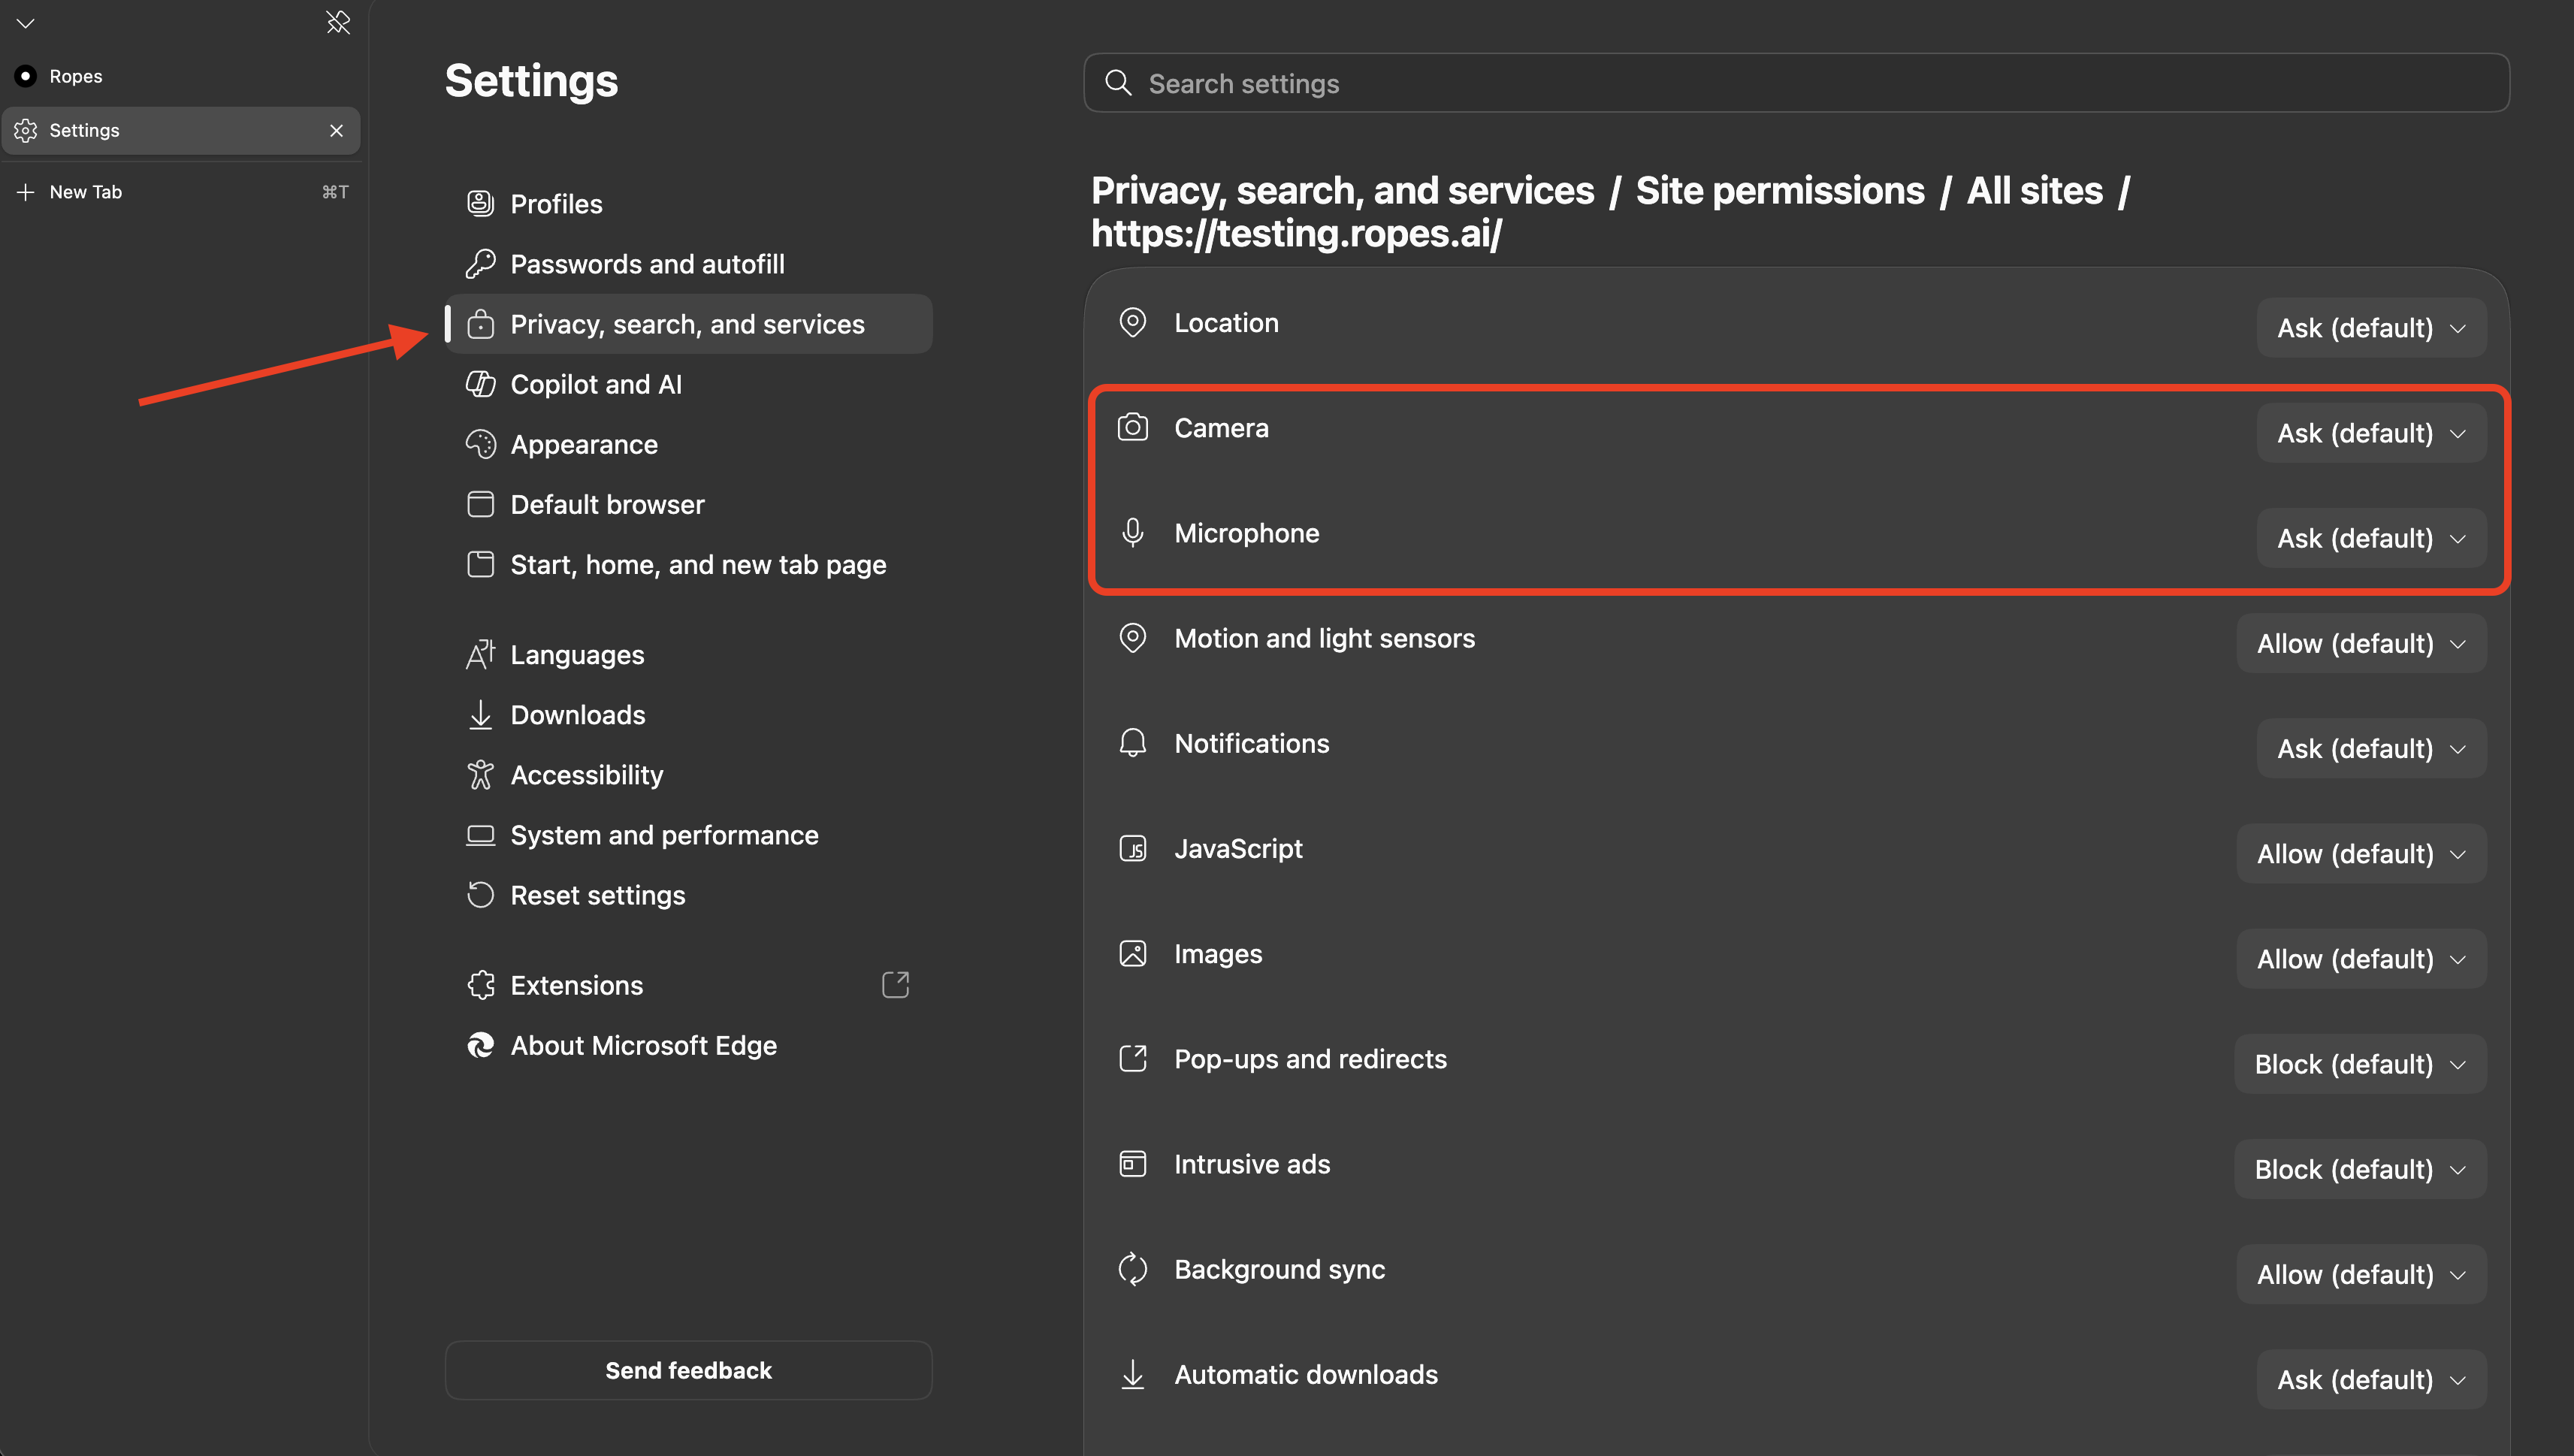
For a shortcut, paste edge://settings/content/camera or edge://settings/content/microphone into the Edge address bar and press Enter.
Check Windows camera and microphone permissions
Windows 11
Select Start → Settings → Privacy & security → Camera.
Turn on Camera access, Let apps access your camera, and Let desktop apps access your camera.
Select Start → Settings → Privacy & security → Microphone.
Turn on Microphone access, Let apps access your microphone, and Let desktop apps access your microphone.
Fully close Chrome or Edge, reopen it, return to Ropes, and try again.
Windows 10
Select Start → Settings → Privacy → Camera, then repeat under Microphone. Turn on access for the device, apps, and desktop apps. Fully close and reopen the browser afterward.
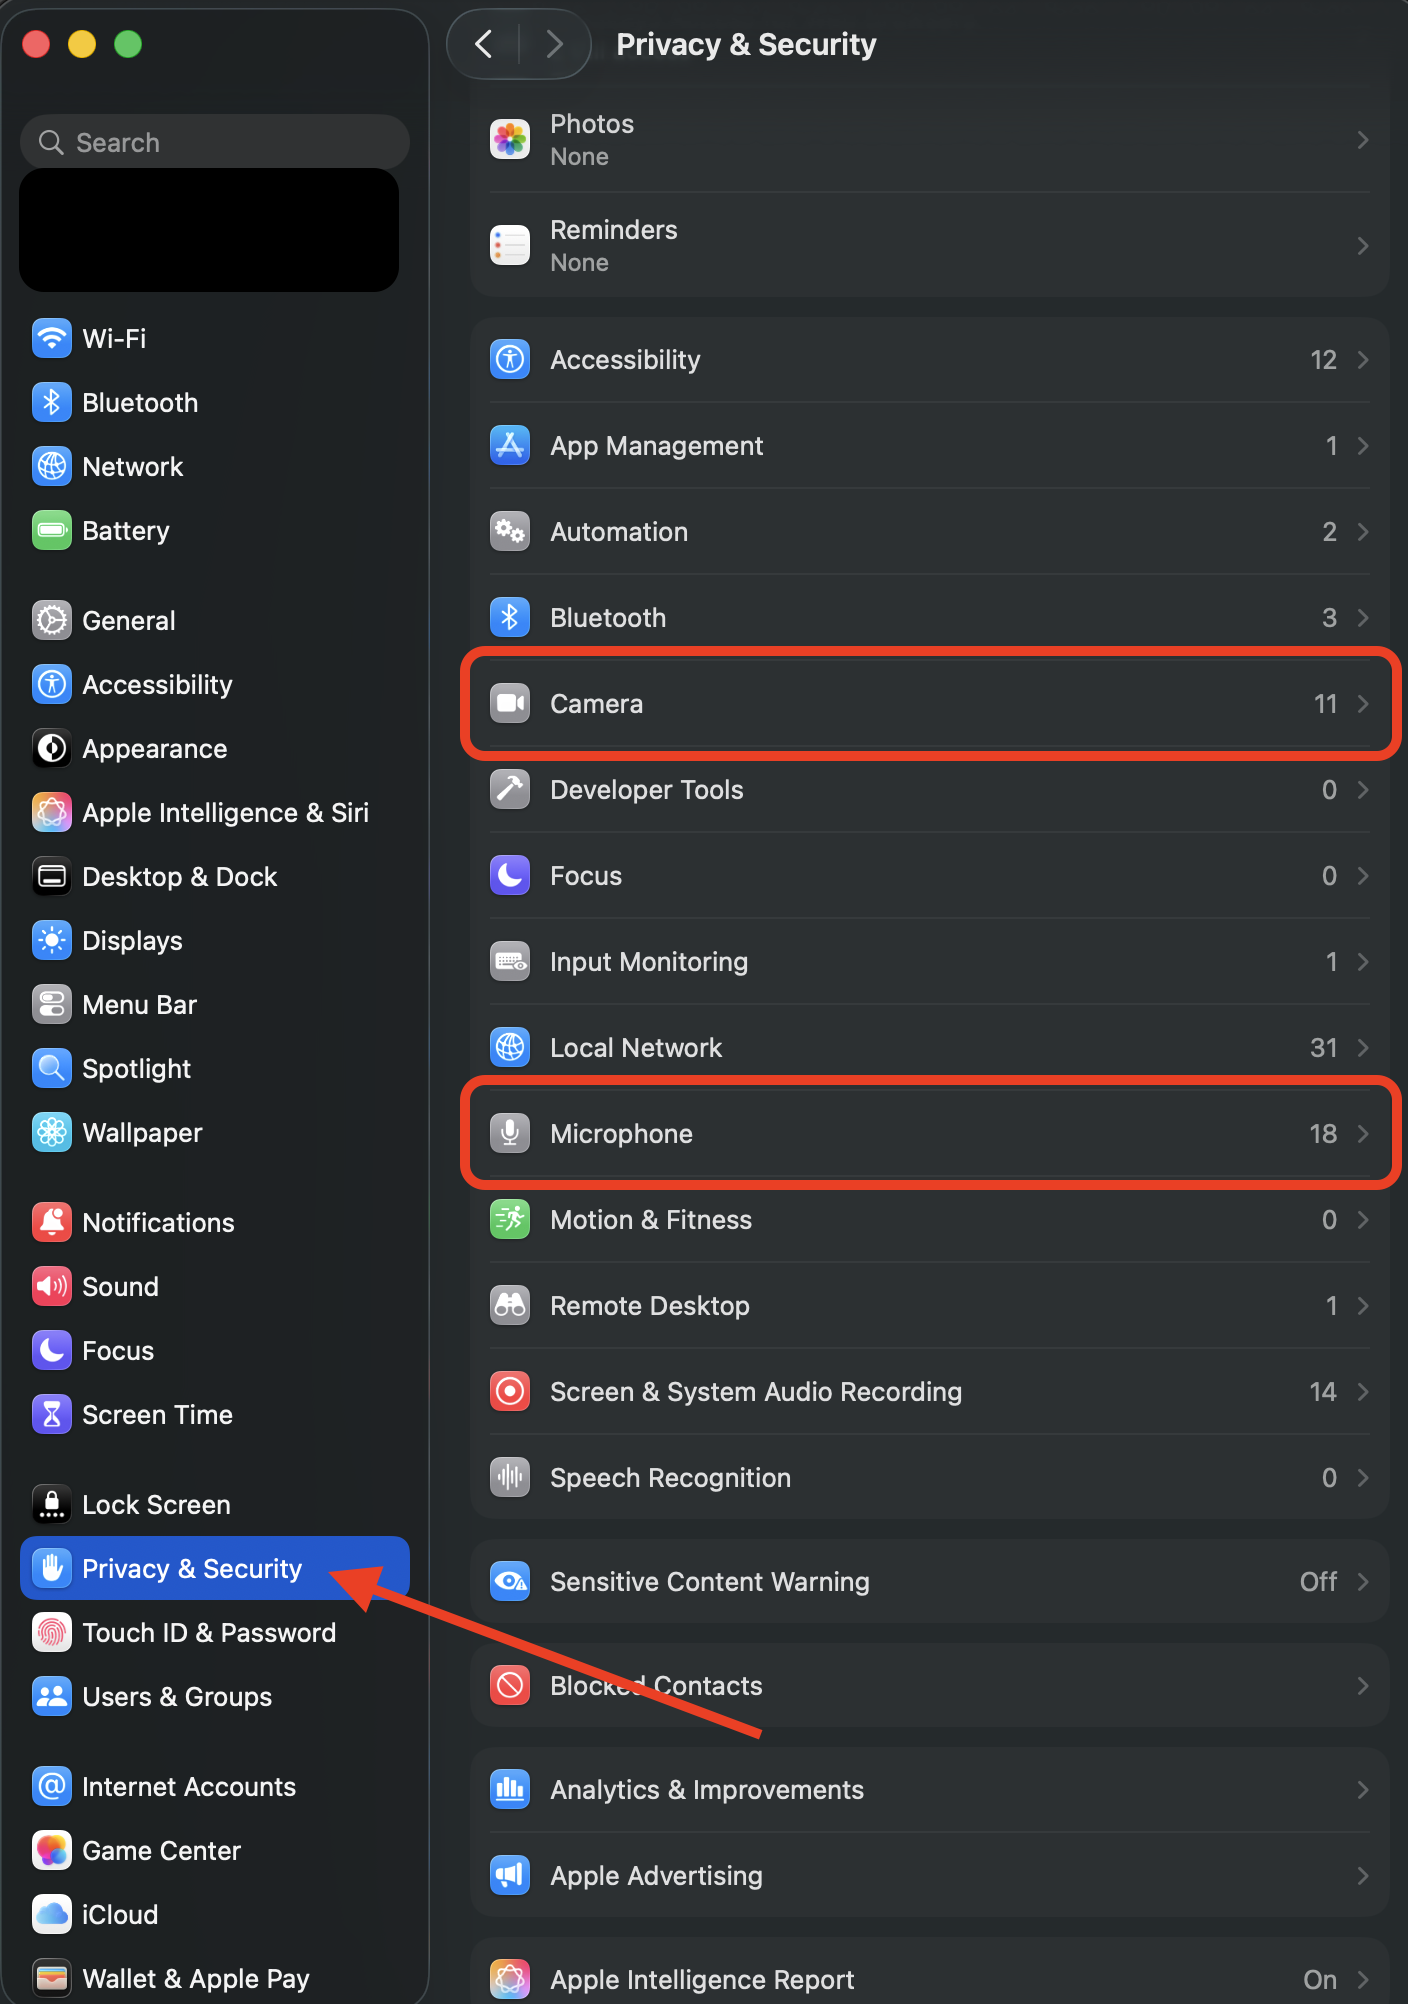
Check Mac camera and microphone permissions
Select the Apple menu in the upper-left corner of the screen, then select System Settings.
Select Privacy & Security → Camera.
Turn on access for Google Chrome or Microsoft Edge, whichever you are using.
Return to Privacy & Security, select Microphone, and turn on access for the same browser.
Press Command-Q while the browser is active to quit it completely. Reopen the browser, return to Ropes, and try again.
Mac privacy settings: open both Camera and Microphone to enable the browser you are using.
Confirm that your computer detects the device
Test the camera
Windows: select Start, type Camera, and open the Camera app. Confirm that you can see a live picture.
Mac: press Command-Space, type Photo Booth, and press Return. Confirm that you can see a live picture.
Test the microphone
Windows 11: select Start → Settings → System → Sound → Input. Select your microphone, speak, and confirm that the input-volume meter moves.
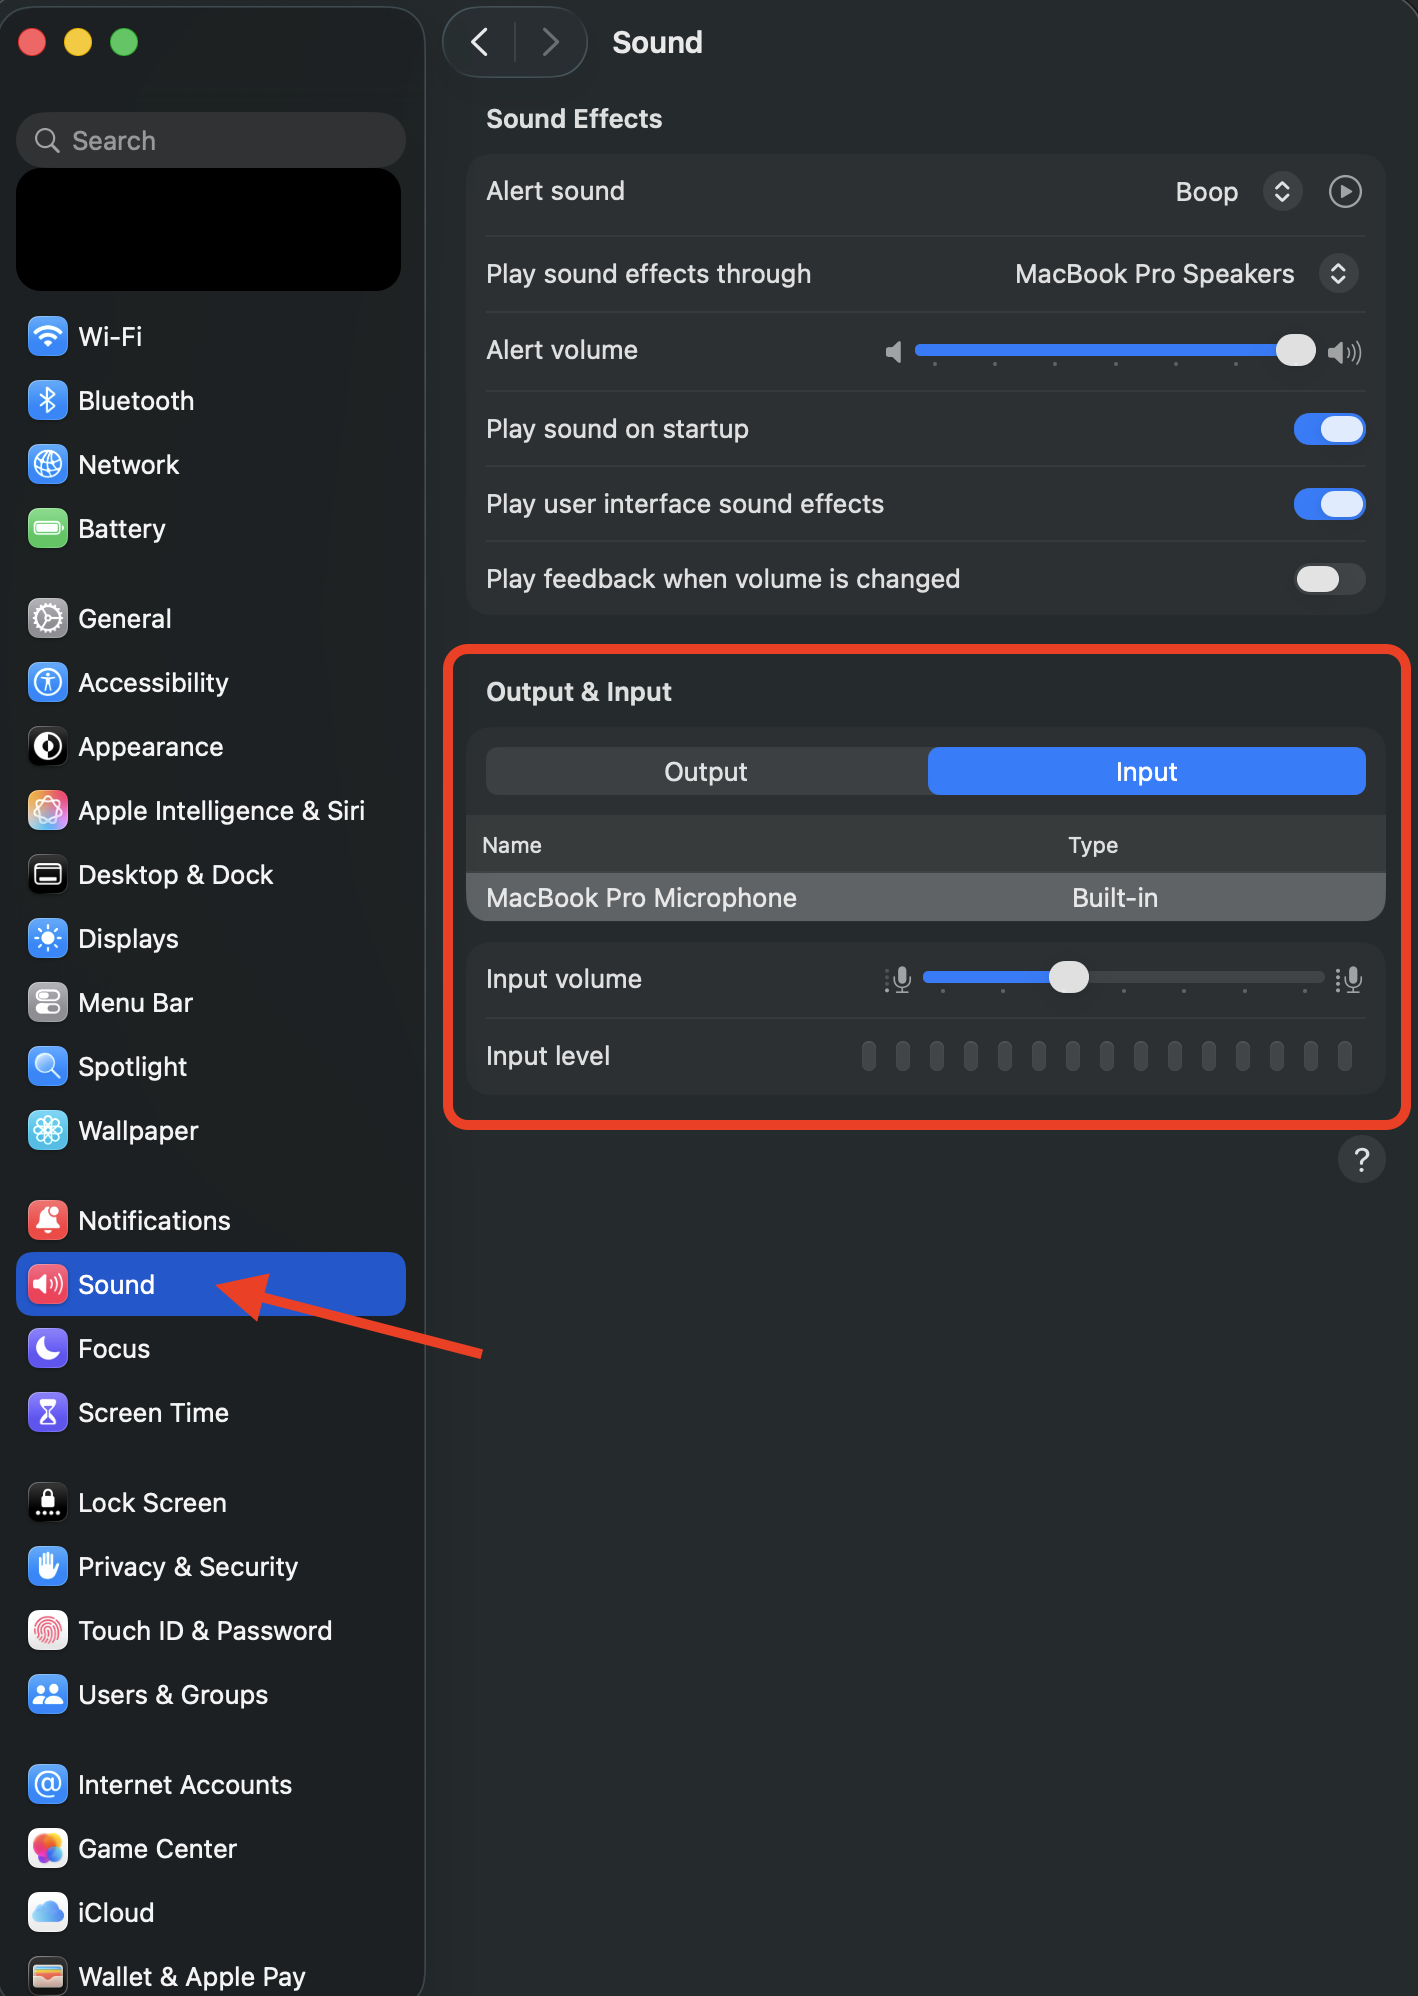
Mac: select Apple menu → System Settings → Sound → Input. Select your microphone, speak, and confirm that the input-level meter moves.
Mac microphone test: select Input, choose your microphone, and confirm that the Input level meter moves when you speak.
If the device does not work in the computer's own Camera app, Photo Booth, or sound settings, reconnect it or select another working device. If no working device appears, use another computer before starting the assessment.
Fix a blank, frozen, or unhealthy video preview
Make sure the lens is uncovered and the room is well lit. Face a light source rather than sitting with a bright window behind you.
In Chrome or Edge camera settings, select your physical webcam. Do not select a disconnected camera or a virtual camera from software such as OBS or ManyCam.
Close every other app and tab that might use the camera, then fully quit and reopen the browser.
Update Chrome or Edge. Select the three-dot menu → Help and feedback → About Google Chrome or About Microsoft Edge, install any available update, and relaunch.
If Ropes reports network delays, disconnect a VPN or corporate proxy if permitted and switch between Wi-Fi and a wired connection.
Return to the equipment test, wait a few seconds for the preview, then select Confirm Video Works.
Fix a microphone that is not detecting sound
Unmute the microphone in your computer settings and on the headset's physical controls.
In Chrome or Edge microphone settings, select the microphone you are actually speaking into.
Disconnect Bluetooth earbuds or a docking station if the browser keeps selecting an old microphone, then select the built-in microphone.
Speak normally for several seconds. When the Ropes meter changes from Make some noise to continue to Audio input detected or Audio level: Good, select Confirm Microphone Works.
If a setting is missing or greyed out
A work or school administrator may control camera and microphone permissions on a managed browser or computer. If a setting says it is managed, has a building or briefcase icon, or cannot be changed, contact your organization's IT team or use a personal computer before the assessment begins.
Still having trouble?
Email support@ropes.ai and include:
Your computer type and operating-system version
Your browser name and version
The exact error message shown in Ropes
Whether your assessment timer has started
A screenshot of the error with personal information hidden
The steps above that you already tried
For more detail, see Google Chrome camera and microphone help, Microsoft's Windows and Edge privacy guide, or Apple's guidance for camera and microphone access.